Invizbox
How to add your VPN credentials to your Invizbox 2
You just received your InvizBox 2 and need to enter your VPN credentials but you are not sure where to enter them or where you can get them from. Or you have a new set of VPN credentials from your VPN provider and wish to use them with your InvizBox 2.
Entering your VPN credentials:
You will first need to reach your InvizBox 2’s Administration Interface. There are two ways to provide the IB2 with your VPN credentials, either during the onboarding or on the ‘VPN Account’ page in the Administration Interface.
Where to find your VPN credential
You can retrieve your VPN credentials here
Onboarding:
The first time you access the Admin Interface (either on your computer or using the Android or iOS app) you will be prompted to enter your VPN credentials during the onboarding.
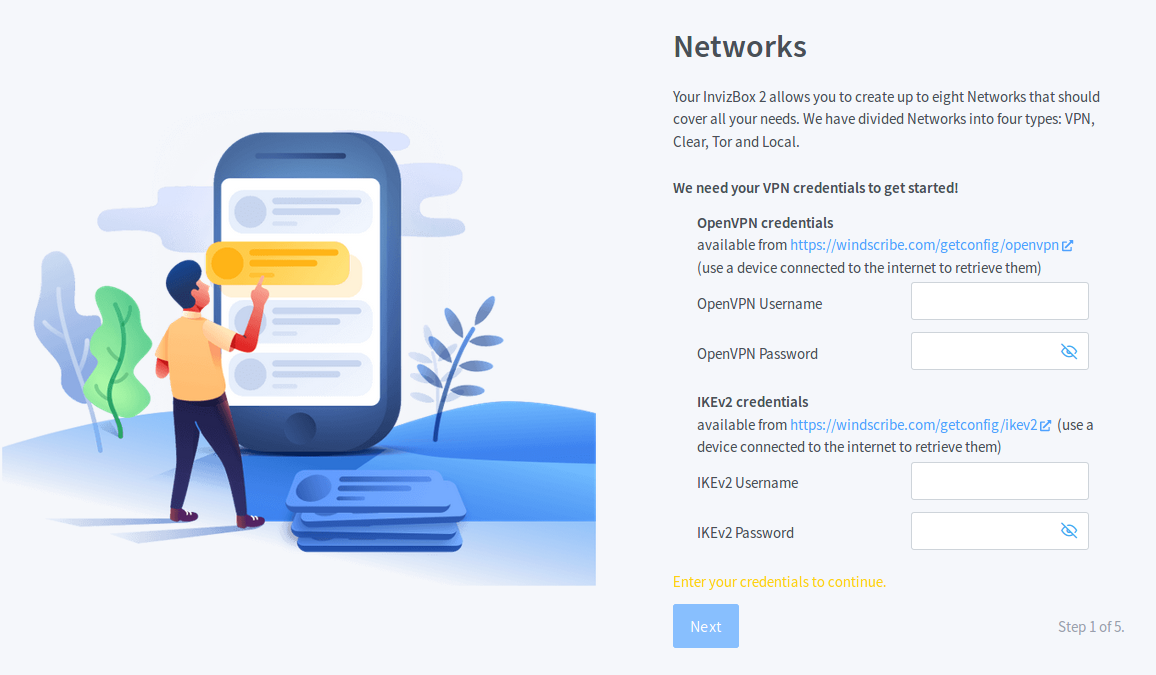
The above image shows the onboarding page from the Android app.
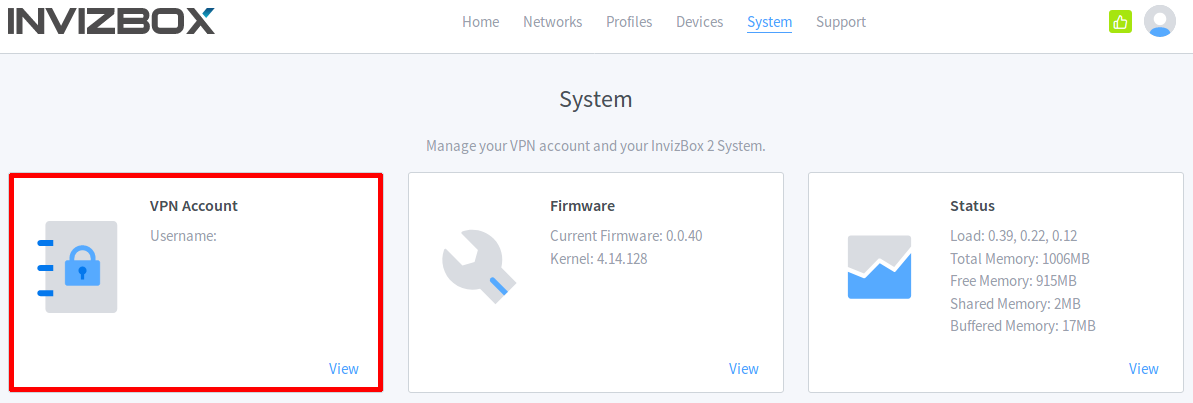
In the Administration Interface:
If you have completed the onboarding and wish to change your VPN credentials you can do so after logging in to the Administration Interface in the ‘System – VPN Account’ page.
How to access the Invizbox 2 admin interface
You are trying to reach the Administration Interface on your InvizBox 2 but don’t seem to be able to get there.
Connecting using the InvizBox 2 Administration app:
Follow these steps to connect using your mobile device:
1. You can download the InvizBox 2 Administration app from the Play Store or the App Store.
2. Connect your mobile device to the InvizBox 2’s WiFi hotspot.
3. Open the app.
If you are having issues ensure that your device is connected to one of your InvizBox 2’s networks.
Connecting using the browser:
Follow these steps to connect using your browser:
- Make sure your device is connected to one of the InvizBox 2 networks (see How do I connect to my InvizBox 2). You will not be able to reach the Administration Interface unless you are connected to the InvizBox 2.
- Open the following link in the browser of your choice: http://inviz.box
- If the above link didn’t work (eg. using a phone which is also connected to 4G), try to connect to the InvizBox 2 using its IP address. For example, for the network present during the first setup named “InvizBox 2 VPN”, that would be http://10.154.0.1.
- If none of the above worked, you may want to try accessing the Administration Interface from another browser (from other customers reports, it seems that sometimes using Firefox was the only one that worked).
Note: All of the networks on your InvizBox 2 use different IP addresses. If you are trying to access the Administration Interface using an IP address as in step 3 above but are not connected to the first InvizBox 2 VPN network you will need to use one of the following addresses:
- http://10.154.1.1 – for the 2nd VPN network
- http://10.154.2.1 – for the 3rd VPN network
- http://10.154.3.1 – for the 4th VPN network
- http://10.154.4.1 – for the Tor network
- http://10.154.5.1 – for the 1st Clear network
- http://10.154.6.1 – for the 2nd Clear network
- http://10.154.7.1 – for the Local network
Note: If none of the above works for you¸ don’t hesitate to contact us by opening a support ticket with Invizbox. In order for them to have some context, please let us know what your operating system is and what browsers you tried and recent changes you made to your InvizBox 2 configuration.
How to Reset the InvizBox?
You will need a paper clip, a pin or some other small object to press the reset button. Take note that any configuration you have changed on the InvizBox will be erased. Perform the steps below to factory reset your InvizBox:
- Unplug all the cables from the InvizBox.
- Power on the InvizBox by plugging in the USB power cable.
- Wait 2 minutes for the InvizBox to boot up.
- The reset button is located on the back of the InvizBox beside the USB power connection. Using a paper clip push the reset button and hold it pressed for 10 seconds, any less than that and the InvizBox will only reboot.
- The InvizBox will shut down (the blue LED on the front will go off) and boot back up. Wait another 2 minutes and you are finished! You can plug in the WAN and the LAN cables and connect to the InvizBox’s WiFi hotspot.
How to switch Invizbox 1 to wifi extender mode
1. Make sure the Invizbox is powered on, and you can see the wifi network VanishedVPN
2. Connect your device to the VanishedVPN (the password is on the bottom of the box)
3. Goto http://10.101.0.1 in your browser (same password on bottom of box)
4. You should arrive on the status screen. Click the ‘choose mode’ box and choose ‘wifi extender’ from the next screen.
5. Click ‘save’ and wait for confirmation.
See this screen recording for details https://cl.ly/c36381574965
How to connect your Invizbox to chromecast
By connecting both your device, and Chromecast to your Invizbox, you will be able to easily cast whatever you are watching (such as US Netflix) from your device to your TV.
All you need to do is to disconnect your Chromecast from your existing wifi network, and re-connect to the Invizbox wifi.
This short vide shows you how.
How to enter your VPN credentials on your Invizbox
If you chose to have your Invizbox shipped before you signed up for a subscription, you may need to enter your VPN credentials. This document shows you how to do that.
Connect to the Invizbox via wifi or cable, and login to the administration interface (http://10.101.0.1)
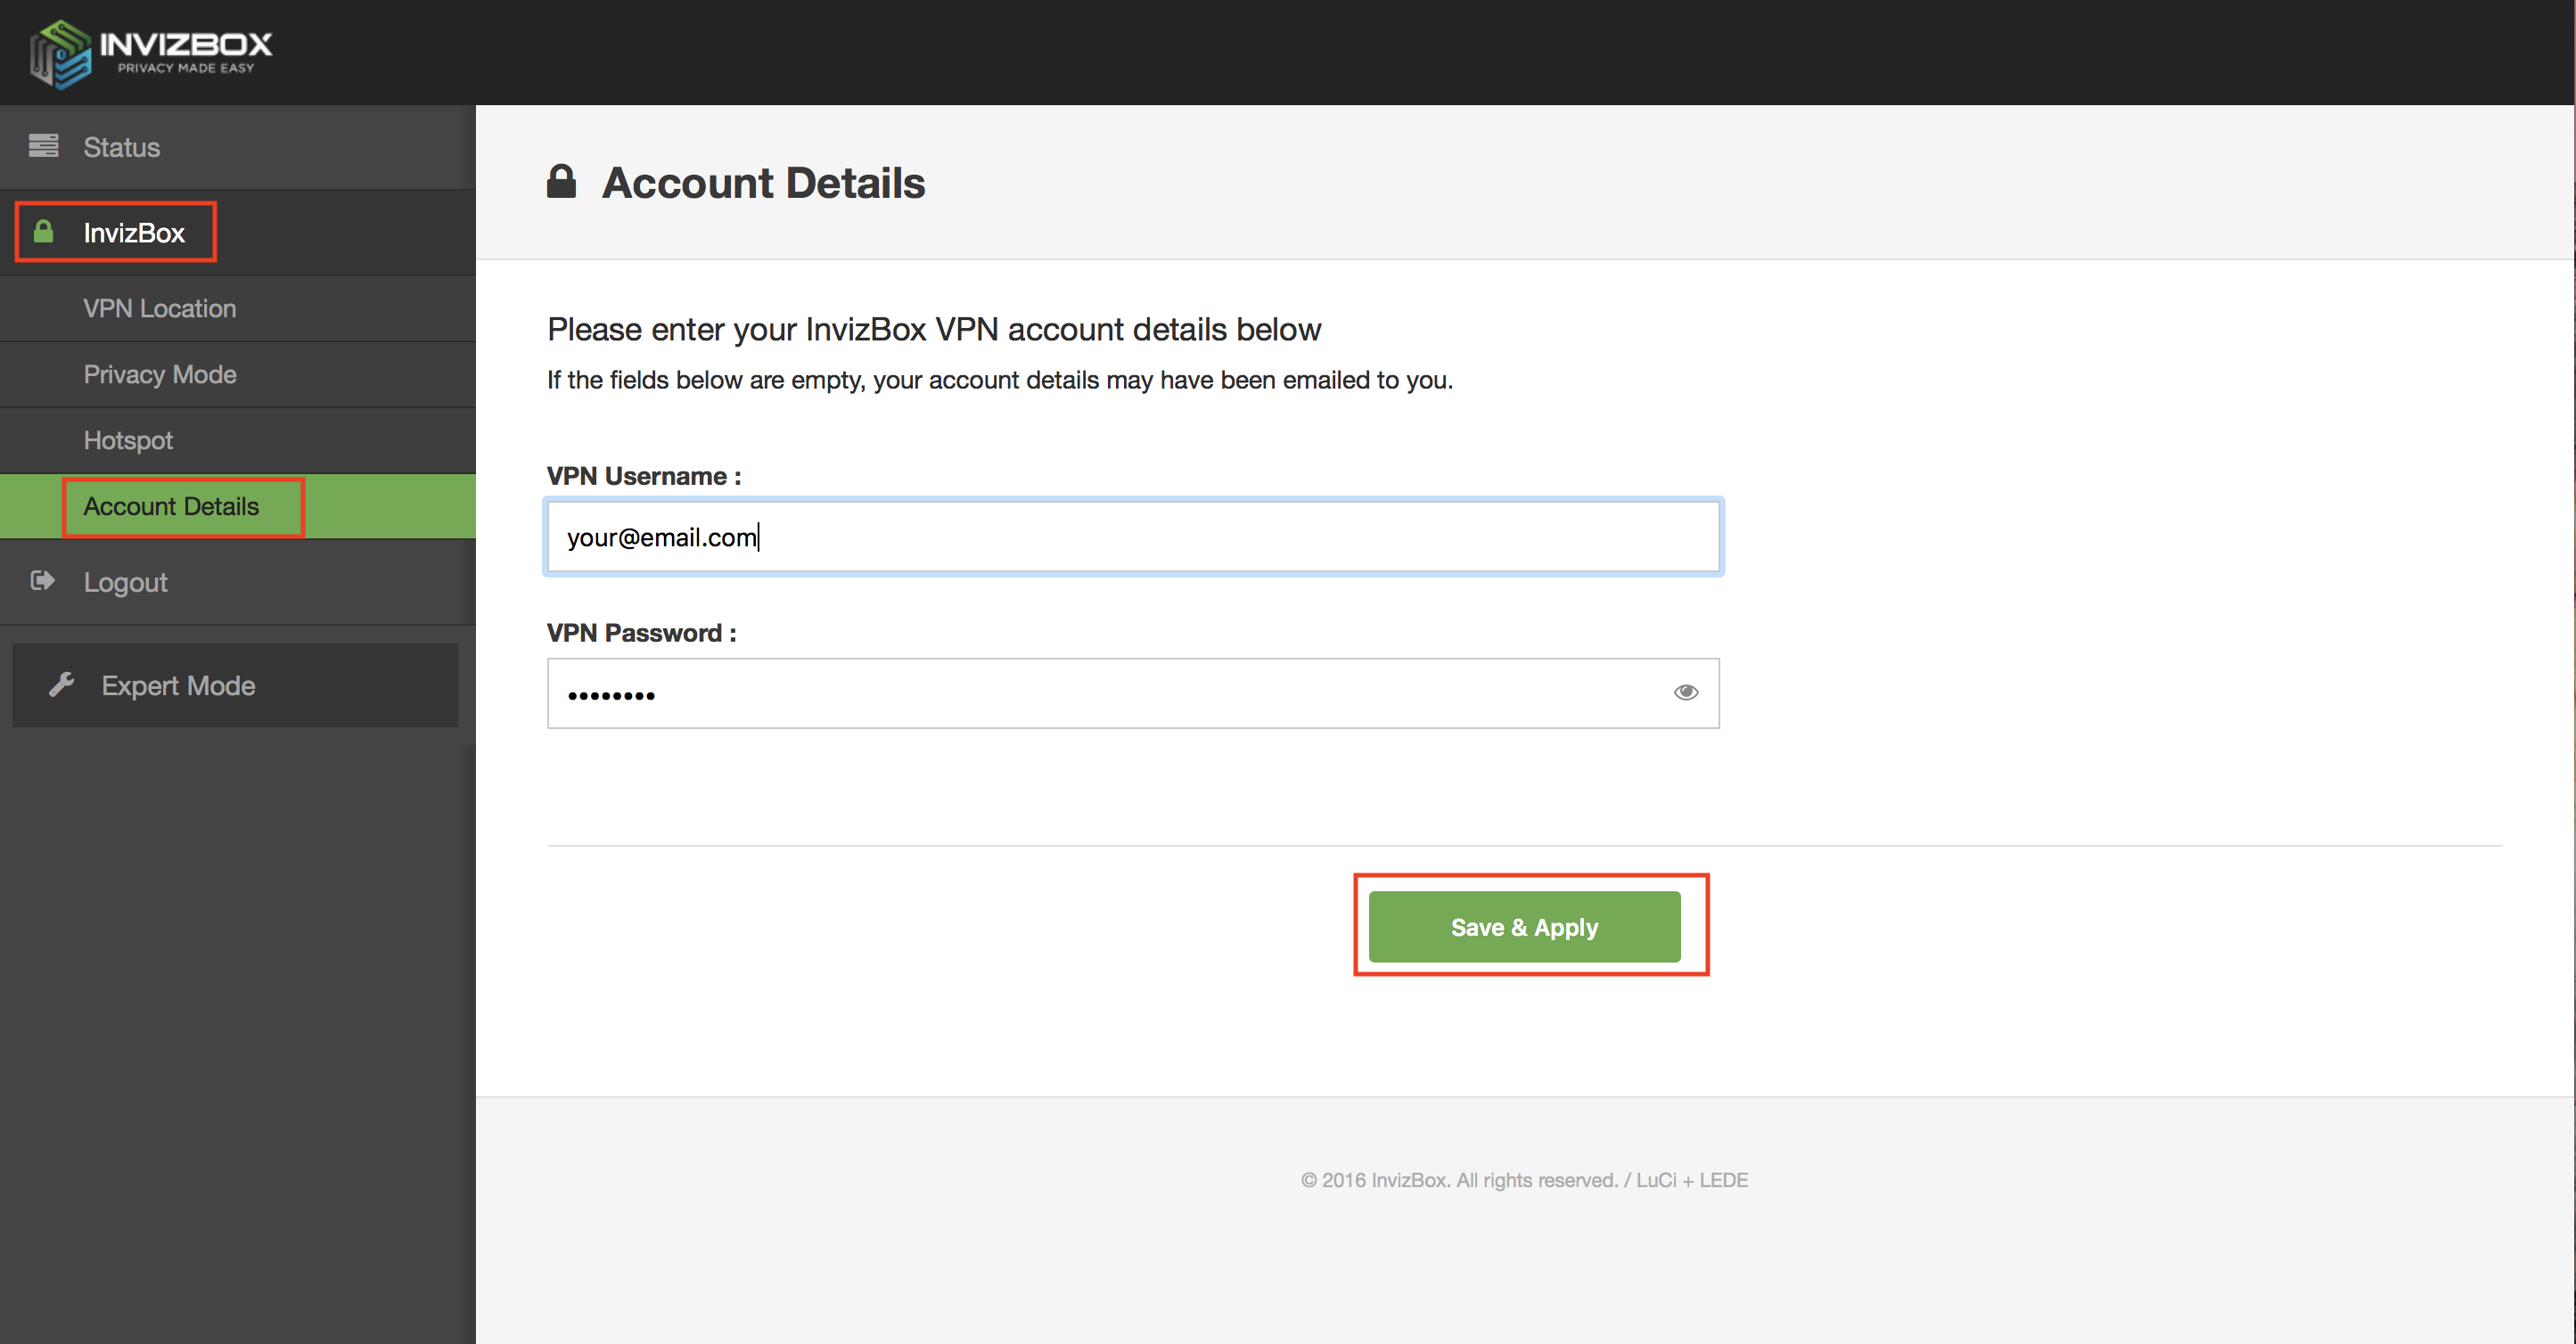
Select Invizbox / Account details from the left hand menu.
Copy and paste your VPN username and password into the relevant boxes
Click Save & Apply
Click Status on the left hand menu, and after a few seconds, you should see the VPN status go green, and you’re connected. If necessary, you can change the country that you’re connected to using these instructions.
How to change which VPN your Invizbox is connected to
This article will show you how to switch VPNs on your Invizbox. For this example, we will switch from USA to UK.
- Login to the administration interface (http://10.101.0.1)
- You should see the status screen showing which VPN the Invizbox is currently connected to
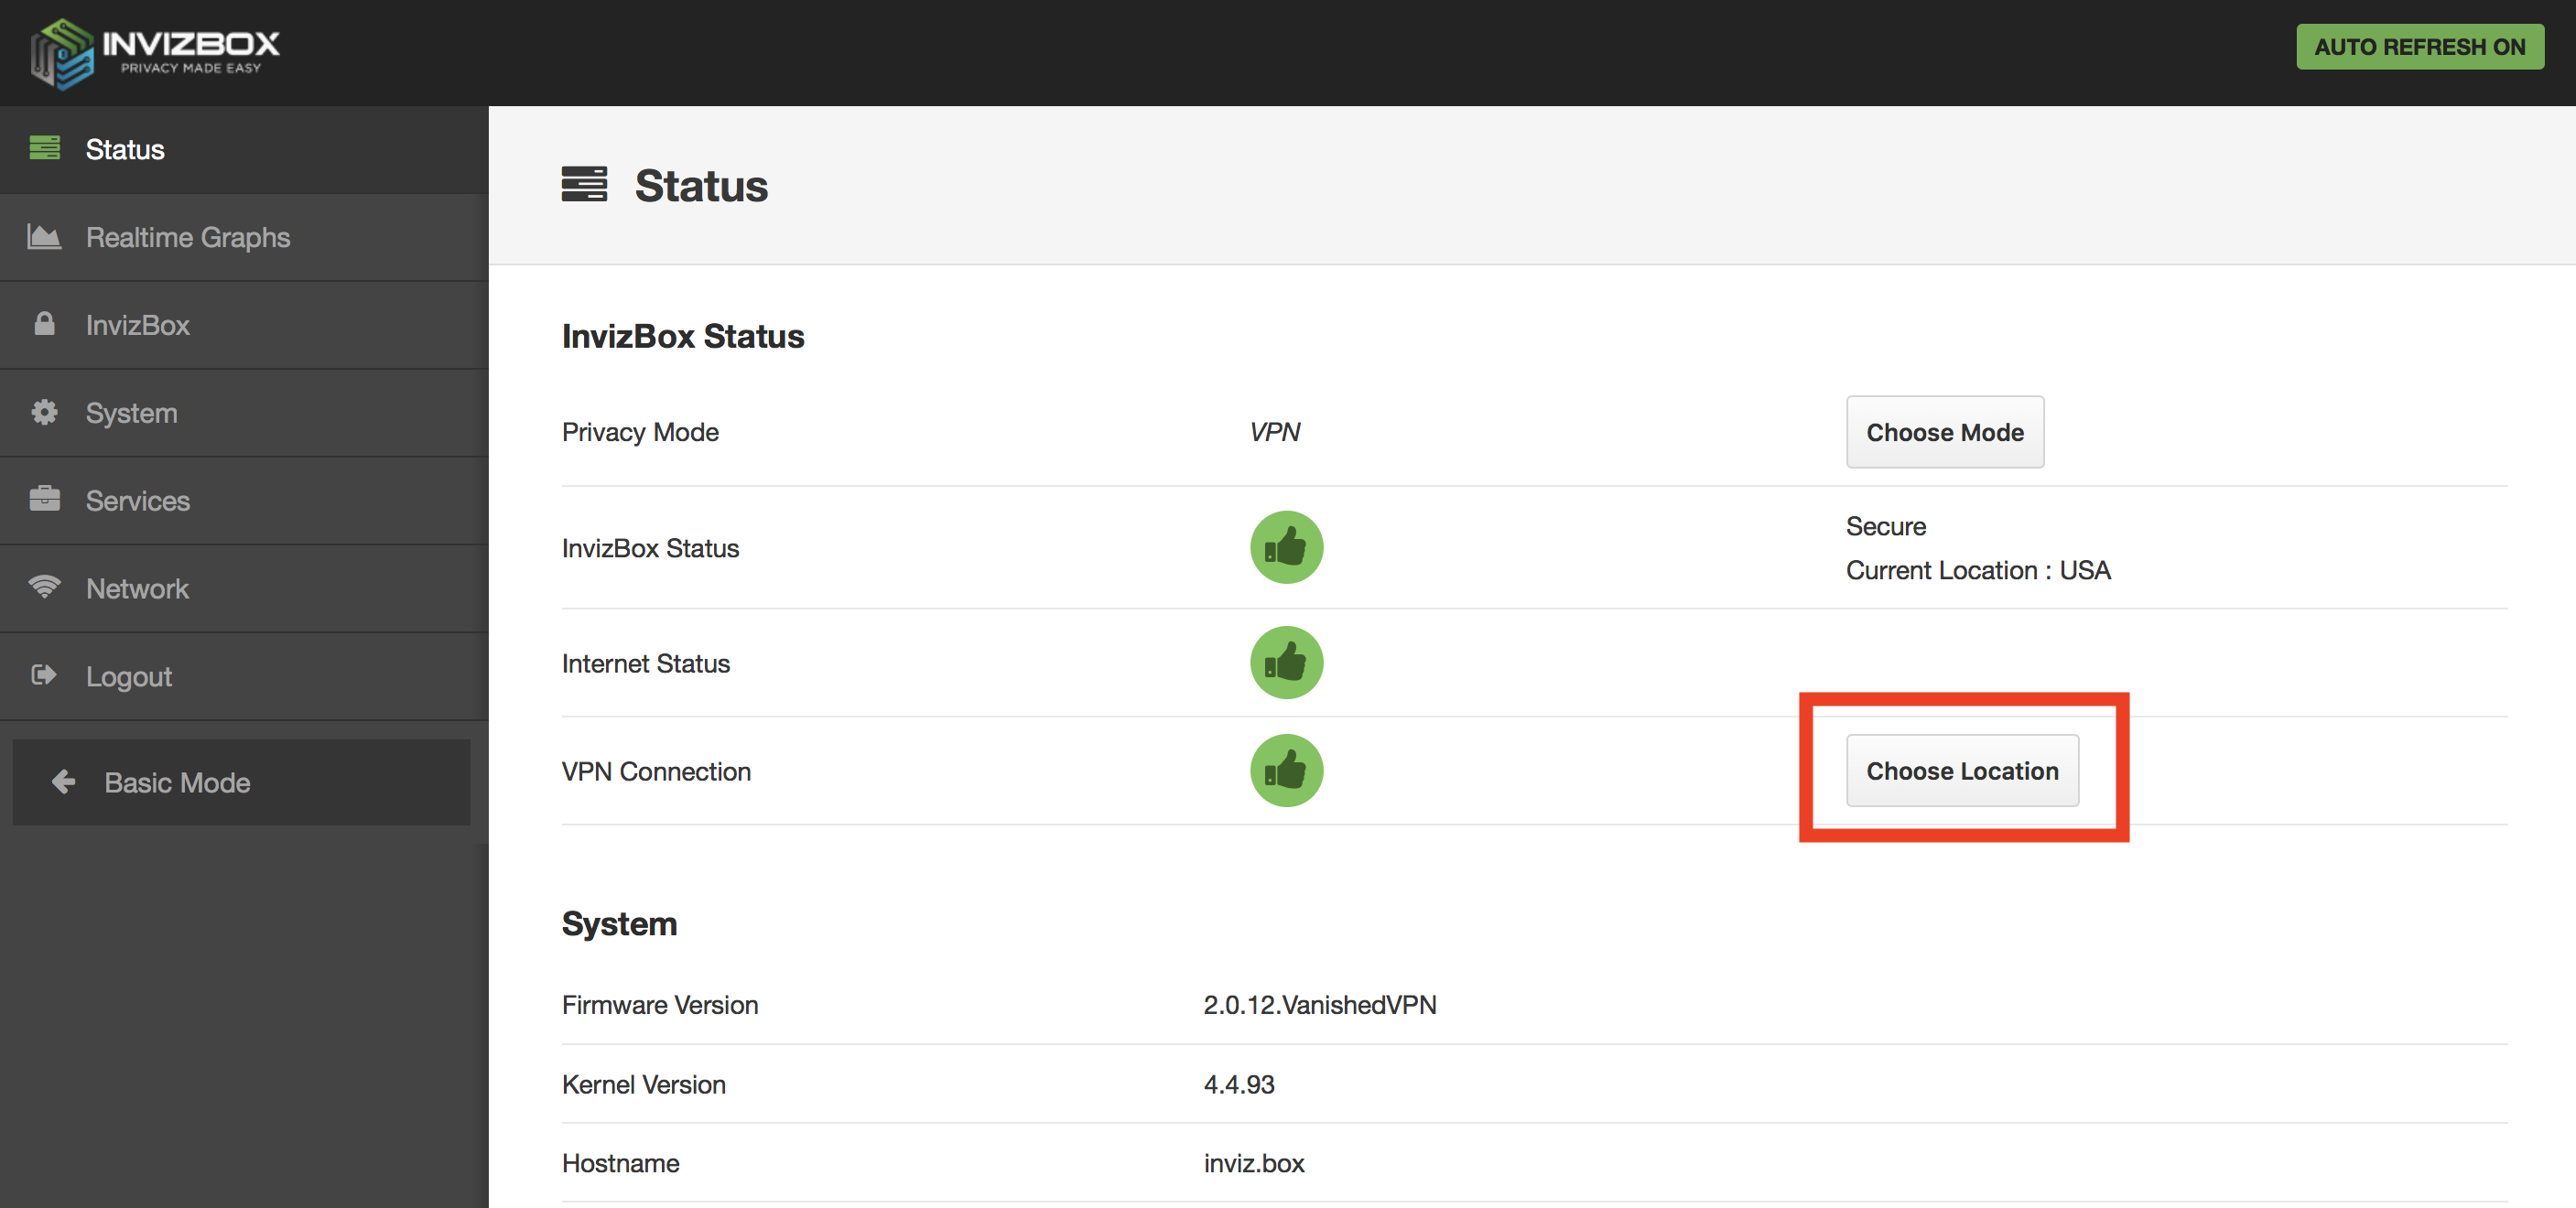
- Click ‘choose location’
- On the next screen, click the dropdown menu under ‘choose country’ and click the new location you want the VPN to connect to (UK in our example).
- Click ‘save & apply
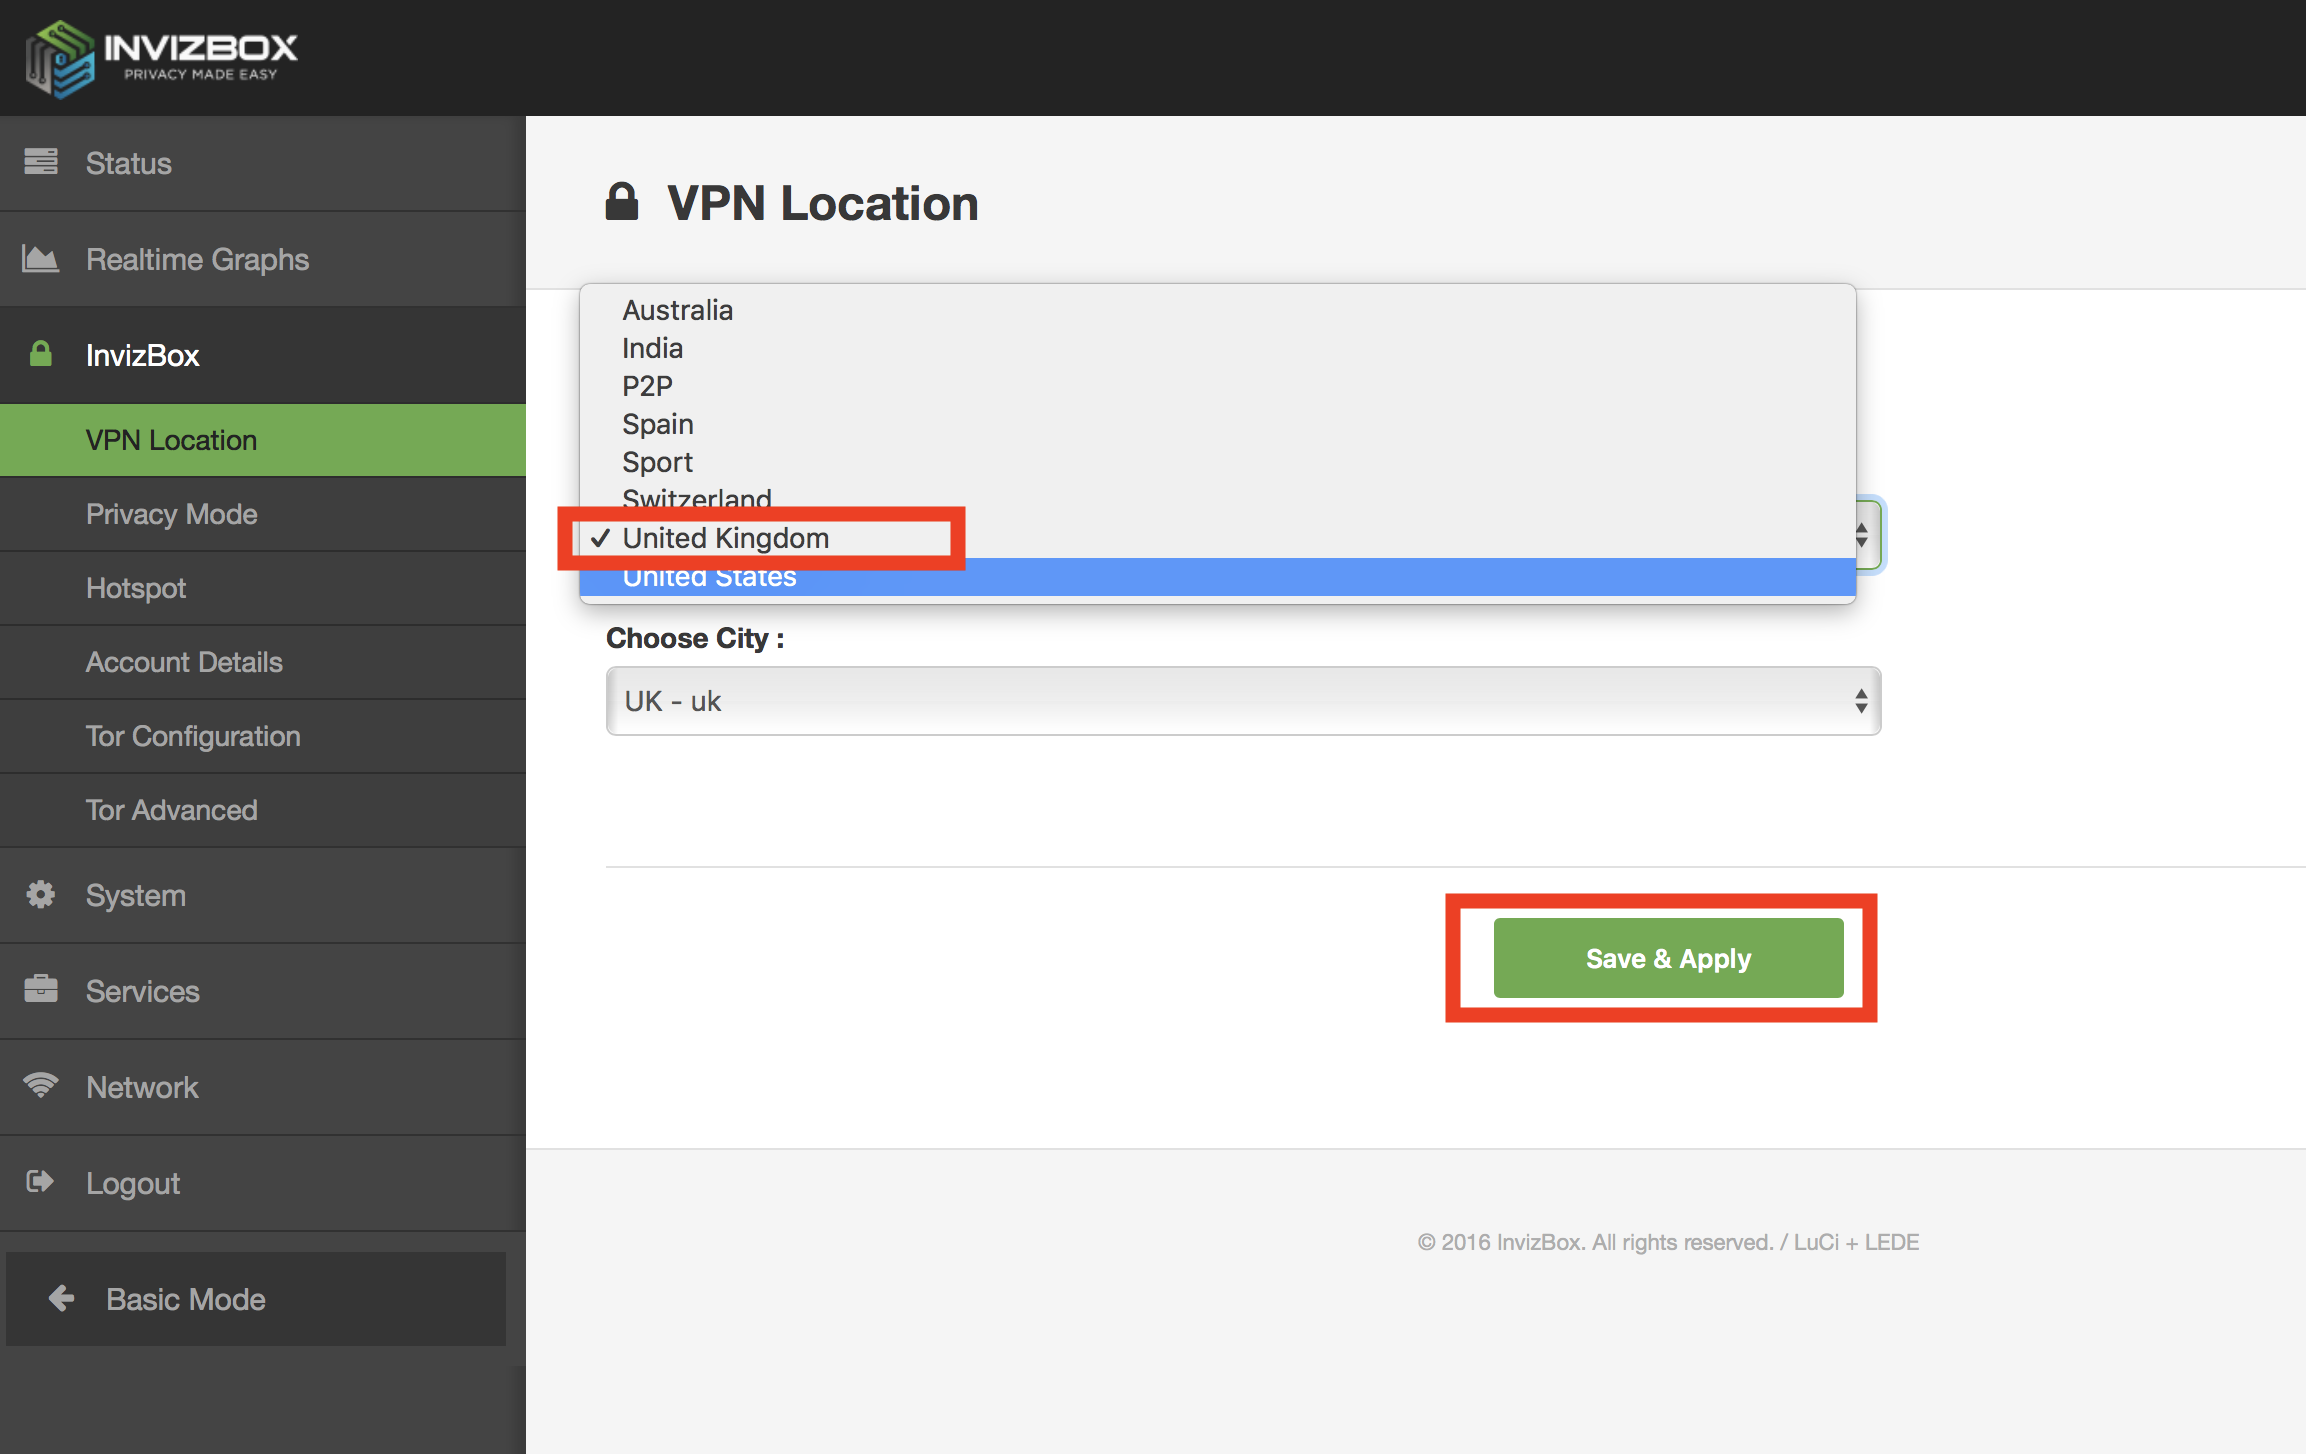
- You should see a couple of messages, and then finally a message saying ‘successfully applied changes’
- Click the status button at the top of the left hand menu to go back to the status screen
- After a couple of seconds the Invizbox status should go green, and your new location should be showing.
- You are now connected to the new VPN.

Amazon Fire TV & Invizbox – Ensuring that default gateway & DNS are correct
To ensure that location is not detected, you may need to force your Amazon Fire TV to send all traffic through the Invizbox VPN default gateway. Follow these instructions to do this.
First you will need to know the IP address of your router. For Invizbox by default this should be
10.101.0.1 To check the IP of your router if you are not sure, follow the Instructions in blue below
To find the router IP on Windows.
- Open up the program command prompt.
- Type “ipconfig” without the quotes and press enter.
- The IP address from default gateway is most likely the IP address of your router.
To find the router IP on OS X.
- Open System Preferences
- Go to Network
- Click Advanced
- Go to TCP/IP – here you will see the routers IP
Changing the DNS on the Amazon Fire TV (Wireless)
- Go to settings
- Select Systems
- Select WI-FI
- Select your WI-FI network and forget WI-FI network by Pressing the button with 3 lines on it.
- Press the select button.
- Select your WI-FI network.
- Enter your WI-FI password and Click on advanced
- Enter the first three groups of numbers exactly the same as the IP address of your router. As an example, if your router IP is 10.101.0.1 , then use the IP address 10.101.0.25 or something to that nature. The important part is to change the last digit (maximum 255) so you get an IP from the same IP range as the router.
- For the Default gateway enter the IP of your router (for Invizbox default, this should be 10.101.0.1)
- Input 24 for the Network Prefix Length and Click Next
- Enter the DNS addresses shown in the table belowPrimary:8.8.8.8Secondary:8.8.4.4
Change the DNS on the Amazon Fire TV (Wired connection directly into Invizbox or other router)
- Go to Settings
- Select System
- Select Network (wired)
- Select Configure Network
- Enter a valid IP from your home network. Find the IP of your router in the guides above.
- Set prefix length to 24. Press Next.
- Set gateway to 255.255.255.0 (You can find the correct gateway by following the guides above). Press Next.
- Set the gateway IP to the IP of your router. Press Next.
- Enter the DNS addresses shown in the table belowPrimary:8.8.8.8Secondary:8.8.4.4
Other Things You Will Need
- Make sure you have a 1-click US address in your Amazon Account.
- Also on Amazon.com go to Your Account > Manage Your Content and Devices > Country Settings and set country to United States
- On the Fire TV Go to “Settings” and select “Time Zone” (15). Select an US Time Zone.
How to upgrade Invizbox firmware
Unless you have downloaded it from this site, it is not advisable to manually flash a firmware on your InvizBox (we will also not support those firmware).
You can find our latest InvizBox firmware here. Download the .bin file
You will need the .bin file for the upgrade. The other .sha file is used for verification (see below)
Make sure you do NOT remove the power source from your InvizBox during the upgrade process
Here are the steps to follow in order to flash a new firmware:
- Make sure you unplug the Ethernet cable from the WAN port
- Restart your InvizBox by unplugging and plugging back in the USB cable
- Connect to it via WiFi or cable (it may take a minute for it to be available as the Invizbox is restarting)
- Login to the administration interface (http://10.101.0.1)
- click on ‘Expert mode’ on the left hand
- Go to the ‘Flash new firmware’ page from the system/backup flash firmware menu
- Make sure the ‘keep settings’ box is unticked
- Click ‘choose file’ and select the .bin file that you downloaded
- Click “Flash Image”. The next page will take a few seconds to load.

- In the next page, make sure the hash is identical to the one in the .sha file (download it & open in a text editor to view).
- If the numbers match, proceed to flashing by clicking the ‘Proceed’ button (only click once)

- Once on the Flashing page, do not power off the device (as stated)
- The Invizbox LED will stay off until it reboots itself (it takes a couple of minutes), the LED then turns on during the boot sequence and turns off again
- Once you have observed that boot sequence, plug your Ethernet cable back in the WAN port
- You can connect to your InvizBox again, login and check the version on the status page