Microsoft
How to fix 809 error “the network connection between your computer and the VPN server could not be established because the remote server is not responding …”

If you have your VPN client configured but you are getting the error above (or error 809 on older windows), it is because Windows won’t let you establish a VPN through your firewall.
Note: A one-time registry change is required if the VPN server and/or client is behind NAT (e.g. home router). You must reboot your computer when done. It is good practice to backup the registry first.
For Windows Vista, 7, 8 and 10
Open a command prompt (CMD) as administrator , and copy and paste the red text below. Then re-boot your machine.
REG ADD HKLM\SYSTEM\CurrentControlSet\Services\PolicyAgent /v AssumeUDPEncapsulationContextOnSendRule /t REG_DWORD /d 0x2 /f
After the machine has been re-booted, connect to the VPN: Click on the wireless/network icon in your system tray, select the new VPN entry, and click Connect. If prompted, enter Your VPN Username and Password, then click OK.
Once you have completed these steps, you should be able to connect to the VPN, and see content from the location you have connected to (ie you should see the US Netflix catalogue if you are connected to the USA VPN Server). If you still see local content, we recommend that you complete the steps here to stop DNS leaking.
Windows 7 L2TP VPN Setup guide
Configure the VPN connection
- Go to “Start”, then “Control Panel”, then “Network and Internet”, then “Network and Sharing Center”.
- Click “Set up a new connection or network”.
- Select “Connect to a workplace” and click “Next”.
- Click “Use my Internet connection (VPN)”.
- For “Internet address:” enter the server name from the list below , for example “usa.vanishedvpn.com”.
- For “Destination name:” enter e.g. “USA”.
- Select “Don’t connect now; just set it up so I can connect later”. Leave the other boxes unchecked.
- Click “Next”.
- For “User name:” enter your username & password from your credentials here. Click “Remember this password”
- Leave “Show characters”, and “Domain optional:” blank.
- Click “Create”.
- Now click “Close”. Do NOT click “Connect now” yet, as there is additional configuration required.
- Go to “Start”, then “Control Panel”, then “Network and Internet”, then “Network and Sharing Center”.
- Click “Change adapter settings”.
- Right-click the VPN adapter you have just configured e.g. “USA” and select “Properties”.
- Click the “Options” tab. Untick “Include Windows logon domain”.
- Click the “Security” tab. For “Type of VPN” select “Layer 2 Tunneling Protocol with IPsec (L2TP/IPSec)”.
- Click “Advanced settings”.
- In the “Advanced Properties” window, select “Use preshared key for authentication”, and for “Key”: enter “happiness”.
- Click “OK”.
- Back in the “USA Properties” window, click “OK”.
Connect to the VPN service
- Go to “Start”, then “Control Panel”, then “Network and Internet”, then “Network and Sharing Center”.
- Click “Connect to a network”.
- In the pop-up window at the bottom right of the screen, select the VPN connection you have created, e.g. “USA”, and click “Connect”.
- Enter your UUN and the password which you specified when you registered for the VPN service, then click “Connect”.
- You should now be connected to the VPN service.
Troubleshooting
If the instructions above do not result in a successful connection to the VPN service, please check that Windows services on your device are configured as described below.
- Go to “Start”, then “Control Panel”, then “System and Security”, then “Administrative Tools”.
- Double click “Services”.
- In the “Services” window, scroll down the list to “IKE and AuthIP IPsec Keying Modules”. Double click on this item.
- In the “IKE and AuthIP IPsec Keying Modules Properties” window, ensure “Startup type” is set to be “Automatic”.
- If the “Service status” is not “Started”, click “Start” to start the “IKE and AuthIP IPsec Keying Modules” service.
- Click “OK”.
- Now back in the “Services” window, double click on “IPsec Policy Agent”.
- Repeat the same process as for the “IKE and AuthIP IPsec Keying Modules”, ensuring the “Startup type” is set to be “Automatic” and the “Service status” is “Started”.
- Click “OK”.
- Close the “Services” window
Now connect to the VPN service as described above.
WIN 10 & 8.x L2TP VPN setup guide
L2TP VPN setup guide – Windows 10 and 8.x:
The guide below will take you through the steps required to configure the native L2TP client on Windows. We also support OpenVPN solution for Windows. See the guide here if you would prefer to install OpenVPN.
Before you start, ensure that you are not connected to another VPN already, and that you do not have any other unblocking solutions (such as Hola) installed on your machine. If you have a Hola extension on your browser you need to remove it (it will still be active even if its disabled). There is a video here to guide you through the setup.
1) From the lower right corner click on “Action Center” icon. 2) Then press on “VPN”.

This will open “Network & Internet” settings window. (3) Click on “Add a VPN connection”.

On the next page fill the fields with the following settings:
4) VPN provider – Windows (built-in).
5) “Connection name” – Give a memorable name to this connection. For example name it “VanishedVPN L2TP”.
6) “Server name or address” – Copy & paste the servername you want to connect from this list
7) “VPN type” (7) – select “L2TP/IP sec with pre-shared key”.
In the ‘Pre-shared key’ box (8) enter happiness
“Type of sign-in info” – select User name and password.
9) In the “User name” and “Password” fields copy & paste the username and password from the ‘my account’ section of our site (note all credentials are case sensitive). Check all selected data once again and press “Save” .

Now you can see your VPN connection was created.

After that you have to make a couple of small changes. Right-Click on the monitor or Wi-Fi icon on the bottom right-hand corner. Then Click on “Open Network and Sharing Center”
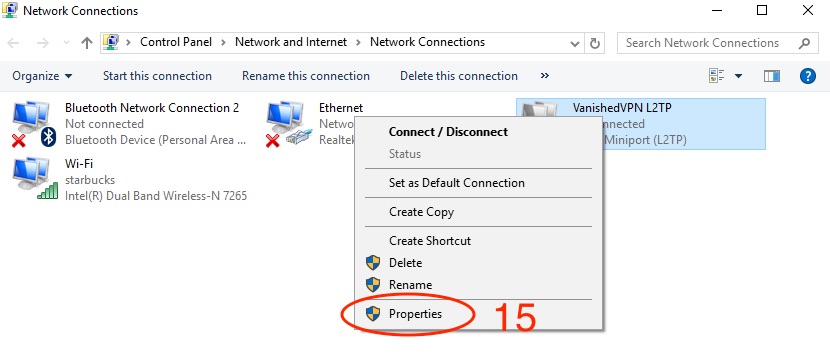
Click on “Change adapter settings” .

Right click on the VPN connection and go to “Properties”.
Go to “Security” tab. Here select “Allow these protocols” and check the top 3 boxes.
- Unencrypted password
- “Challenge Handshake Authentication Protocol (CHAP)” and deselect all others.
- Microsoft CHAP version 2
Click ‘OK’. Now your L2TP VPN connection is created and all traffic will be encrypted.
To connect to L2TP protocol click ok Network icon (Wi-Fi or wired) and click on the desired VPN connection.

This will open your “Network and Internet” settings. Click on desired VPN connection and press on “Connect” button .

If you get an error at this point, you will need to make the registry change below.
Note: A one-time registry change is required if the VPN server and/or client is behind NAT (e.g. home router). You must reboot your computer when done. It is good practice to backup the registry first.
For Windows Vista, 7, 8 and 10
Open a command prompt (CMD) as administrator , and copy and paste the red text below. Then re-boot your machine.
REG ADD HKLM\SYSTEM\CurrentControlSet\Services\PolicyAgent /v AssumeUDPEncapsulationContextOnSendRule /t REG_DWORD /d 0x2 /f
After the machine has been re-booted, connect to the VPN: Click on the wireless/network icon in your system tray, select the new VPN entry, and click Connect. If prompted, enter Your VPN Username and Password, then click OK.
Once you have completed these steps, you should be able to connect to the VPN, and see content from the location you have connected to (ie you should see the US Netflix catalogue if you are connected to the USA VPN Server). If you still see local content, we recommend that you complete the steps here to stop DNS leaking.
**Note – ALL CREDENTIALS ARE CASE SENSITIVE AND MUST BE ENTERED EXACTLY AS THEY ARE ON THE WELCOME EMAIL THAT YOU RECEIVED