Windows
WIN 10 L2TP VPN setup guide
L2TP VPN setup guide – Windows 10:
The guide below will take you through the steps required to configure the native L2TP client on Windows 10. We also support OpenVPN solution for Windows. See the guide here if you would prefer to install OpenVPN.
Pre-requisite:
Before you start, please ensure that you are not connected to another VPN already, and that you do not have any other unblocking solutions (such as Hola) installed on your machine. If you have a Hola extension on your browser, you need to remove it (it will still be active even if its disabled). There is a video here to guide you through the setup.
Each step explained with image for reference, please follow each step carefully for successful setup.
Steps:
1) From the lower right corner click on “Action Center” icon.
2) Then press on “VPN”.

3) This will open “Network & Internet” settings window. Click on “Add a VPN connection”.

4) On Add a VPN connection pop-up window add each information as below.

4.1 VPN provider: Windows (built-in)

4.2 Connection Name: Give any specific name as per your choice.

4.3 Server name or address: Add server address from the list that you would like to connect with.

4.4 VPN type: select “L2TP/IP sec with pre-shared key”.

4.5 Pre-shared Key: happiness

4.6 Type of Sing-in info: Select Username and password option.

4.7 Username & Password: copy & paste the username and password from the ‘my account’ section of our site (note all credentials are case sensitive). Check all selected data once again and press “Save”.

5) Now you can see your VPN connection setup has been created.

6) We are almost there to establish the connection. Couple of more steps to go before you start enjoying your VPN. Right-Click on the monitor or Wi-Fi icon on the bottom right-hand corner. Then Click on “Open Network and Sharing Center”
Click on “Change adapter settings”.

7) Right click on the VPN connection and go to “Properties”.

8) Go to “Security” tab. Here select “Allow these protocols” and check the top 3 boxes.
- Unencrypted password
- “Challenge Handshake Authentication Protocol (CHAP)” and deselect all others.
- Microsoft CHAP version 2
Click ‘OK’. Now your L2TP VPN connection is created, and all traffic will be encrypted.

9) To connect to L2TP protocol click ok Network icon (Wi-Fi or wired) and click on the desired VPN connection.
This will open your “Network and Internet” settings. Click on desired VPN connection and press on “Connect” button.

OR

If you get an error at this point, you will need to make the registry change below.

Note: A one-time registry change is required if the VPN server and/or client is behind NAT (e.g. home router). You must reboot your computer when done. It is good practice to backup the registry first.
For Windows Vista, 7, 8 and 10
Open a command prompt (CMD) as administrator, and copy and paste the red text below. Then re-boot your machine.
REG ADD HKLM\SYSTEM\CurrentControlSet\Services\PolicyAgent /v AssumeUDPEncapsulationContextOnSendRule /t REG_DWORD /d 0x2 /f
After the machine has been re-booted, connect to the VPN: Click on the wireless/network icon in your system tray, select the new VPN entry, and click Connect. If prompted, enter Your VPN Username and Password, then click OK.
Once you have completed these steps, you should be able to connect to the VPN, and see content from the location you have connected to (ie you should see the US Netflix catalogue if you are connected to the USA VPN Server). If you still see local content, we recommend that you complete the steps here to stop DNS leaking.
**Note – ALL CREDENTIALS ARE CASE SENSITIVE AND MUST BE ENTERED EXACTLY AS THEY ARE ON THE WELCOME EMAIL THAT YOU RECEIVED
How to fix – ERROR: All TAP-Windows adapters on the system are currently in use.

The error “All TAP-Windows adapters on this system are currently in use” suggests that there is a problem with the virtual Tun/Tap network adapter used by OpenVPN on Windows. To solve the issue, you need to re-enable the adapter or reinstall the driver.
Solution 1: re-enable the adapter
Open Control Panel > Network and Internet > Network and Sharing Center > Change adapter settings.
Check description of network adapters to find the Tap-Windows Adapter.
Right click on it > Disable.
Right click again > Enable.
Solution 2: reinstall the Tap driver
Check if it is already installed by opening C:\Program Files\TAP-Windows
Right click on Uninstall and select Run as administrator
Download the Tap driver from OpenVPN repository and install it (right click on it > Run as administrator)
Issues following Windows 10 Creator update
If you find that you are no longer able to connect your VPN following the Windows 10 ‘creator’ update. please try the following:
1) Uninstall openVPN ( Tick remove all settings and file while uninstall if it asks)
2) Delete the openVPN folder from root which is located in C:\Program Files
Click link below to download new openVPN installation file,
openVPN Download
Please install and import all vpn files which you downloaded form our website.
If above steps doesn’t resolve issue then please try steps below,
1) You may need to repeat the registry change to allow the VPN through the firewall. Please floor these instruction:
A one-time registry change is required if the VPN server and/or client is behind NAT (e.g. home router). You must reboot your computer when done. It is good practice to backup the registry first.
For Windows Vista, 7, 8 and 10
Open a command prompt (CMD) as administrator , and copy and paste the red text below. Then re-boot your machine.
REG ADD HKLM\SYSTEM\CurrentControlSet\Services\PolicyAgent /v AssumeUDPEncapsulationContextOnSendRule /t REG_DWORD /d 0x2 /f
2) If you are still having issues after this, and you are using OpenVPN, check in ‘Services’ and ensure that all OpenVPN Services are set to automatic. If they are set to ‘manual’, change them to automatic, and then reboot your machine.ARTICLE PROPERTIESPublishedLast published by Deleted agent
on Sat, 7 Apr 2018 at 10:57 AMAUTHORPhil BishopCreated on Mon, 27 Nov 2017 at 3:38 PMLOCATIONCategoryWindowsVisible in: VanishedVPNFolderTips & FixesVisible to: All UsersTAGSWindows 10 CreatorSEARCH ENGINE OPTIMISATIONTITLE FOR SEARCH ENGINE–DESCRIPTION FOR SEARCH ENGINE–ANALYTICSVERSIONS (1)v.1 Published (Live)27 Nov 2017, 3:38 PMDeleted agent


How to fix error 609
How to stop DNS leaking (Windows 8)
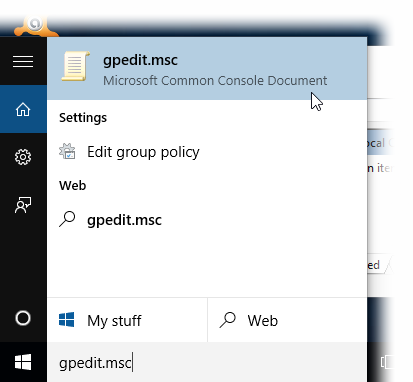
Stop Windows leaking DNS (Windows 8) If you’re connected to our VPN, but still unable to see unblocked (for example connected to our USA server, but seeing the Netflix Australia catalogue), you could be leaking DNS. Windows includes a ‘feature’ which is designed to speed up delivery of local content by using local DNS servers. This needs to be disabled by following the instructions below. Windows 8 Open the Start menu and type gpedit.msc in the search bar,

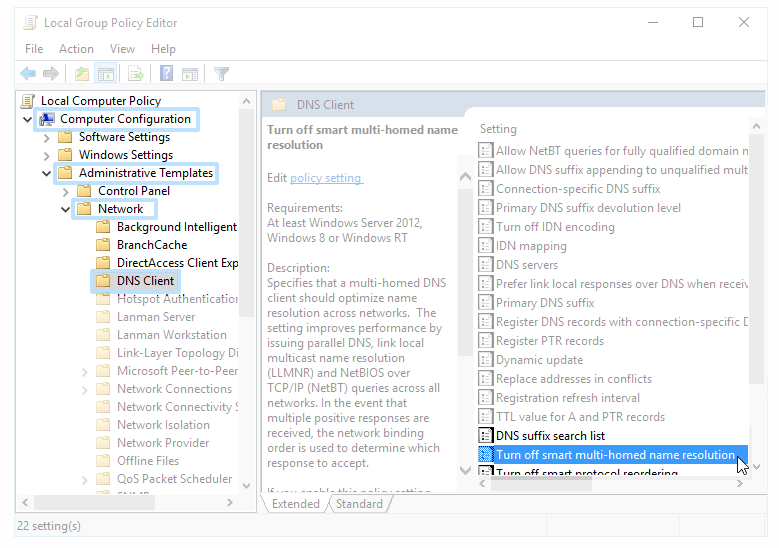
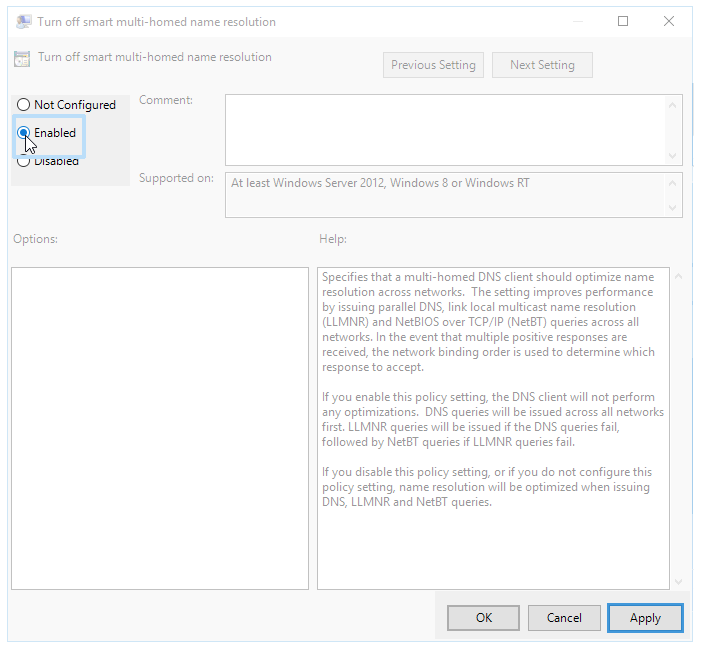
…and double-click gpedit.msc to open the Local Group Policy Editor. Within Computer Configuration select Administrative Templates → Network → DNS Client → Turn off smart multi-homed name resolution.
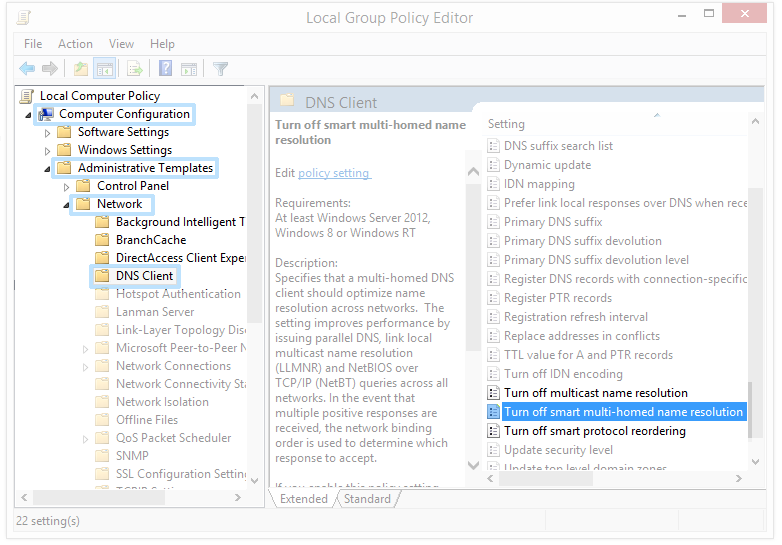
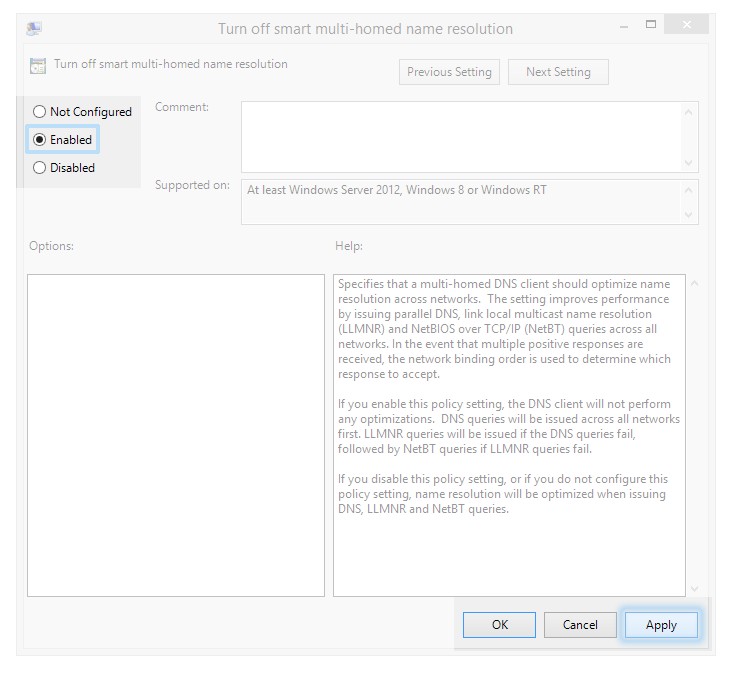
Select Enabled to turn off the service. Click Apply.
How to setup a Windows PC as a virtual wireless router
This guide will show you how to configure your windows PC to share the VanishedVPN connection as a virtual wireless device, so that you can connect to the VPN with a Playstation, ATV, Chromecast, Roku , Smart TV etc that doesn’t support VPN.
First, make sure you have a VanishedVPN subscription, and have setup your VPN client following the guides here.
To check if your windows machine supports this feature, open up a CMD prompt as administrator, and enter
netsh wlan show drivers
If you see “Hosted network supported : Yes”, then your network adapter can create a virtual router.
If you don’t see this message, then you may need to update your network drivers.
Connect your VanishedVPn client.
Create your virtual wireless router
In the command prompt, type the following:
netsh wlan set hostednetwork mode=allow ssid=NETWORKNAME key=PASSWORD
Name your virtual router by setting the following values:
ssid=[choose a name for your network]
key=[choose a password for your network]
Hit Enter.
You will then see the following message:
The hosted network mode has been set to allow.
The SSID of the hosted network has been successfully changed.
The user key passphrase of the hosted network has been successfully changed.
Congratulations! You have successfully created a virtual router.
Start your virtual router
To start your virtual router, type the following in the command prompt:
netsh wlan start hostednetwork
Hit Enter.
If the virtual router starts successfully, you will see a message that says, “The hosted network started.”
If you get a message saying the hosted network could not be started, please update your network adaptors and reboot. Also see this guide for possible fixes.
In order to share your virtual router, you need to identify the name of the connection. Open the “Run” prompt by pressing Windows + R, or by clicking the Start button. Type “ncpa.cpl“, then hit Enter or OK.In the Network Connections window, you should now see your new Wi-Fi connection in your list of network adapters. The description will show the ssid name that you assigned earlier. Note the name of the connection. You will need this later.
Now look for a network connection with the description “TAP-Windows Adapter V9”.
Right-click on it and select Properties.
In the Properties window, click the Sharing tab and check the box for Allow other network users to connect through this computer’s Internet connection.
Under “Home networking connection”, select your newly created virtual router from the drop-down menu. (This is the one you identified earlier). Then click OK.
Congratulations! Your Windows PC is now a virtual router.
Now you can connect any Wi-Fi-enabled device to your new virtual router and share your VPN connection.
How to disable the virtual router
To disable your virtual router, return to the command prompt and type the following:
netsh wlan stop hostednetwork
You will see a message that says, “The hosted network stopped.”
This will stop and disable your virtual router. If your virtual router is no longer in theNetwork Connections window, then you have successfully disabled it.
Stop Windows leaking DNS (Windows 10)
Stop Windows leaking DNS (Windows 10) If you’re connected to our VPN, but still unable to see unblocked (for example connected to our USA server, but seeing the Netflix Australia catalogue), you could be leaking DNS. Windows includes a ‘feature’ which is designed to speed up delivery of local content by using local DNS servers. This needs to be disabled by following the instructions below.
**Note – This will not work on Windows 10 Home edition
Windows 10 To disable the “smart multi-homed name resolution” service:
- Open the Start menu and type gpedit.msc in the search bar,
- …and double-click gpedit.msc to open the Local Group Policy Editor. Within Computer Configuration select Administrative Templates → Network → DNS Client → Turn off smart multi-homed name resolution.
- Select Enabled to turn off the service. Click Apply.
Windows DNS leaking hints / Tips & fixes
Unfortunately, microsoft (in their wisdom) have designed some annoying features into Windows which can mean that although you are connected to a VPN, windows will still ‘leak’ requests locally to your ISP, which gives the game away to Netflix and other sites that you may be trying to unblock.
If you’re not using Windows home edition, you may be able to simply disable this feature using the guide here. If that doesn’t work, we have also included some alternative methods below.
1. Download VPN check Pro This has a built in option to stop DNS leak, and comes with a free trial (so that you can see if it works), and only costs $19 if you decide to buy the full version. It also includes a ‘kill switch’ function that may be useful if you are using P2P Bit Torrent.
2. Change the DNS servers on all of your network interfaces (see our preferred DNS providers below). This will force every network interface to use the DNS that you specify, and will stop DNS leaks.
a) Open Network and Sharing centre (by clicking on the network icon in the bottom toolbar).

b) Right-click on your main connection & select ‘properties’

c) Look through the list and find ‘Internet Protocol Version 6 (TCP/IPv6). Untick the boxd) Look through the list and find ‘Internet Protocol Version 4 (TCP/IPv4). Highlight it, and click on ‘properties’
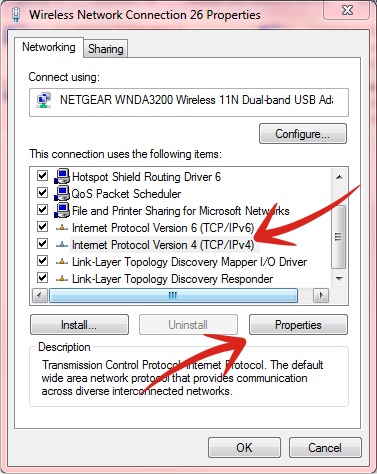
e) Make a note of any DNS servers that have already been populated, in case you need to change back. Click on ‘use the following DNS server addresses’ radio button, enter the relevant addresses from the choices below. Click ‘OK’ and restart the connection.

We suggest using the Open DNS:
- Preferred DNS server: 208.67.222.222
- Alternate DNS server: 208.67.222.220
or Google
- Preferred DNS server: 8.8.8.8
- Alternate DNS server: 8.8.4.4
How to solve ‘A connection to the remote computer could not be established. You might need to change the network settings for this connection.’
If you are seeing the following error have a look at the link below which may help you solve this issue.
‘A connection to the remote computer could not be established. You might need to change the network settings for this connection.’
How to Fix – “The connection was terminated by the remote computer before it could be completed”
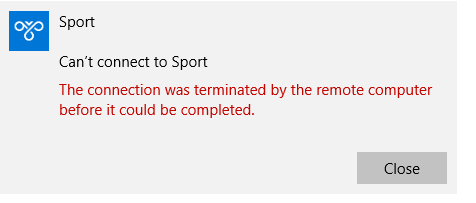
If you are getting this error, just follow the steps below to fix it, and then retry
Right-Click on the monitor or Wi-Fi icon on the bottom right-hand corner. Then Click on “Open Network and Sharing Center”
Click on “Change adapter settings” .

Right click on the VPN connection and go to “Properties”.

Go to “Security” tab. Here select “Allow these protocols” and check the top 3 boxes.
- Unencrypted password
- “Challenge Handshake Authentication Protocol (CHAP)” and deselect all others.
- Microsoft CHAP version 2
Click ‘OK’. Now your L2TP VPN connection is created and all traffic will be encrypted.