OpenVPN
How to setup OpenVPN on Asus routers
This will help you configure OpenVPN on any Asus router running ASUSWRT, including
- RT-N66U
- RT-AC56U
- RT-AC66U
- RT-AC68U
- RT-AC68P
- RT-AC87U
- RT-AC3200
- RT-AC88U
- RT-AC3100
- RT-AC5300
1) Download one or more of the VanishedVPN OpenVPN config files from here, depending on which VPN(s) you intend to setup. For example, if you’re intending to unblock US Netflix, download the USA config file.

2) Follow the informative guide at VPNUniversity.com
How to setup OpenVPN on Tomato routers
The following screen shots show an example of working config on Tomato. In this example 192.168.4.1 is the local router ‘gateway’
The OpenVPN config files can be found here

Router is linksys E4200 running Tomato
WAN: 192.168.5.0/24 by DHCP
LAN: 192.168.4.0/24 (router as dhcp server)

This is where you add the ca certificate

* Basic WAN set-up: specify DNS manually to avoid dns leak

* DHCP options: dns (need 3 for those devices that need 3 – against dns leak) + additional gateway setting required for my wifi clients only (possibly a bug ?)

* fix on syntax of mtu for openvpn

How to setup OpenVPN on Android devices
For this setup, you will need to download the OpenVPN app from the Google Play store, and load the VanishedVPN config files. This should take around 5-10 minutes.
1. Start by downloading the config files that you need from here.
2. You may want to open this link on your android device, and download directly to the SD card. The names of the files correspond to the location that you want the VPN to be in. For example if you want to watch US Netflix, you’ll need the USA.ovpn file.


3. Go to the Google Play App store.

4. Tap on the search button in the App store.
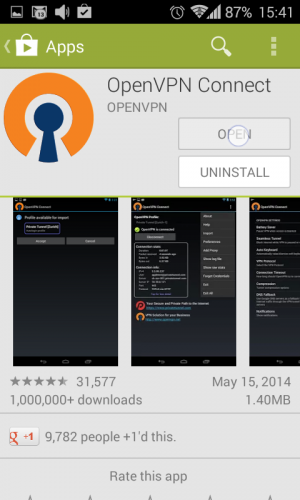
5. Search for the app called OpenVPN Connect.
6. Install the application into your device.
7. Accept to the pop-out terms.
8. Open the application.
9. Tap on the menu button on the top-right screen in the application.
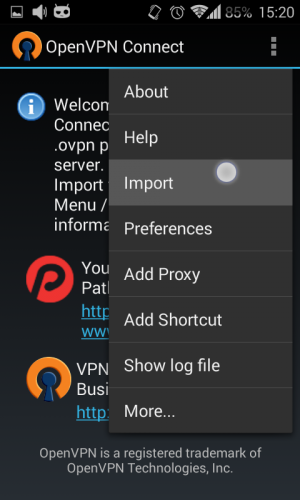
10. Tap on Import in the dropdown.
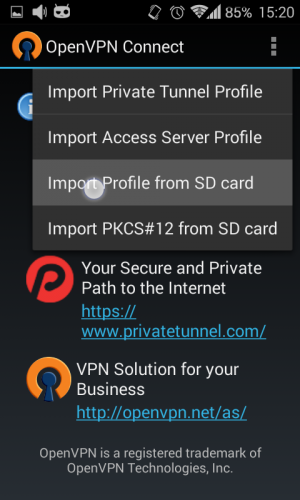
11. Choose Import profile from SD card and find the downloaded configuration files (they will be downloaded to the downloads folder by default).
12. Tap on one of the configuration file that you downloaded earlier and import it.
13. Accept the profile.
14. Perform steps 9 to 13 and add other server configurations into the app (optional).
15. Select a server by tapping on the box with a dropdown menu and choosing one server.
16. Enter your VPN credentials .These are case sensitive so we strongly suggest copy and pasting.
17. Tap on Connect.
18. Continue to connect without a certificate.
19. You should now have successfully connected. To check your connection, try to access content from the location that you are connected to (i.e. US Netflix if you are connected to the USA VPN).

20. To disconnect from the server tap on Disconnect button.
How to setup OpenVPN on IOS (iPhone / iPad)
How to setup OpenVPN on IOS (iPhone / iPad)
1) Download and install the ‘OpenVPN Connect’ app from the app store

2) Download the VanishedVPN OpenVPN config file from here for the Server that you want (i.e. usa.ovpn for the USA VPN to watch US Netflix)

3) Put the downloaded file somewhere where it can be found (we put ours on the desktop, it may be in your download folder).
4) Connect your iPhone or iPad to your PC or Mac, and open iTunes .
5) Select the device, and click on ‘Apps’ on the left hand menu.
6) Scroll to the bottom in the main window, and click on the OpenVPN icon in the ‘Apps’ box
7) Drag and drop the file you downloaded in step 2 (usa.ovpn in our example) into the ‘OpenVPN Documents’ box

8) Open the App on your iPad / iPhone

9) You should see the new certificate. Click on the green ‘+’ sign , which will take you to the next screen

10) Enter your VPN credentials (we strongly suggest copy and paste, as these are both case sensitive)

11) Click save. You should be all setup and ready to go now.
12) To connect, click the switch below the ‘Disconnected’ text. You should see the VPN connecting and then ‘connected’ displayed.

If the VPN fails to connect, check your username and password is exactly as it is in the welcome email that you received. Your VPN password is not the password that you use to access ‘my account’ on our site. It is different for security reasons.

You should now be connected, and you should be able to access unblocked content from the country that you are connected to (i.e. US Netflix from the USA VPN).
How to setup OpenVPN on Mac OSX
To setup OpenVPN on your mac, you will need to download and install Tunnelblick, and then load a configuration file for each VPN connection that you want to setup. This should take 5 to 10 minutes to complete.
Install Tunnelblick
1) Open up a browser, and navigate to https://tunnelblick.net/downloads.html
2) Download the latest ‘stable’ build for the version of OSX that you are running (you can check the version by right clicking the apple icon in the top left hand corner of your screen, and selecting about this Mac)

3) Double click on the tunnelblick_xxxx_build_xxxx.dmg that you just downloaded file to start the installation. Double click the ‘tunnelblick’ icon in the next box, and click OPEN on the pop-up dialogue box.

4) At this point you may be prompted to enter a password. This is the password that you use to unlock you Mac.

5) Click through the next 3 default answers


You should now have tunnelblick installed, and be able to see the icon in your toolbar.

Install the OpenVPN config files.
Repeat the next steps for each VPN that you want to setup (we’re using USA as an example).
5) Download the VanishedVPN OpenVPN config file from here for the Server that you want (i.e. usa.ovpn for the USA VPN to watch US Netflix)

6) Double click on the downloaded file (it should be in your ‘downloads’ folder). This should open up Tunnelblick. Choose either ‘All users’ or ‘only me’ from the next screen (depending on if you share your machine, and want to give other users access to the VPN).

You will be asked to enter your password again. This is the password that you use for unlocking your Mac.

You should now see a message saying ‘installation successful’
Connect.
You are now ready to connect to the VPN.
Move your mouse over the tunnelblick icon in your tool bar. You should see a box appear with the name of the VPN server that you downloaded the config for.
Click ‘connect’. A box will appear asking you for your username and password. Copy and paste your VPN credentials. Check the boxes ‘save in keychain’ to save having to enter these again.
Press OK.

You should see the connection box display some connectivity messages, and it will then go green when connected.

You should now be connected. To test the connectivity, check to see if you’re able to access content from the location that you are connected to (for example if you’re connected to the USA, you should see the US catalogue when you go to netflix.com).
If the VPN doesn’t connect, left click on the tunnelblick icon, and choose ‘VPN details’ where you can check the config, credentials, and setup automatic start at login etc.
Documents and support for Tunnelblick can be found here.
https://tunnelblick.net/documents.htmlTo disconnect, left click the Tunnelblick icon, and select ‘disconnect’ .
How to Setup OpenVPN on OpenWRT routers
The following is an example of working config kindly provided by a member of the VanishedVPN community.
In this example config is applied via command line. You should be reasonably tech savvy to be able to complete this, and leave yourself 30 mins > 1 hour to configure and test.
- Using the Web interface enable NTP and set the timezone, ensure the time on the device is correct.
- Log into the router using SSH.
- Install OpenVPN
opkg update
opkg install openvpn-openssl openvpn-easy-rsa luci-app-openvpn openssh-sftp-server
- Verify the packages/programs wget, scp and kmod-tun are installed, OpenVPN relies on the tun kernel module being installed – In theory opkg should have installed these dependencies.
- Move the /etc/easy-rsa directory to somewhere else, in case you do an upgrade and overwrite your files.
mkdir /etc/config/openvpn-config
mv /etc/easy-rsa/* /etc/config/openvpn-config/
rm -rf /etc/easy-rsa/
ln -s /etc/config/openvpn-config/ /etc/easy-rsa
rm /etc/config/openvpn_recipes
touch /etc/config/openvpn-config/client.ovpn
- Create a password file in /etc/openvpn eg usa.txt
- Put the username and password on two separate lines in the text file
- Edit the ovpn file from Vanished
- Add the password filename to the auth-user-pass line, e.g.: auth-user-pass usa.txt
cp usa.ovpn /etc/openvpn
chmod 400 /etc/openvpn/1300WebProDC.txt
- Create a tun interface for OpenVPN to use
cat >> /etc/config/network << EOF
config interface ‘Vanished_VPN'
    option proto 'none'
    option ifname 'tun0'
EOF
In the web interface add the tunnel interfaces (Tun0) to the Wan Zone

Then Select WAN for the Zone

- Save and Exit
- Go to System->Startup
- In the system startup command put
openvpn --cd /etc/openvpn --config /etc/openvpn/usa.ovpn
- Save and exit
- Reboot the router
——
Here is copies of some of our configs:
/etc/openvpn/usa.ovpn ——client
nobind
dev tun1
comp-lzo no
auth-user-pass usa.txt
resolv-retry infinite
persist-key
persist-tun
reneg-sec 0
verb 3
proto udp
tun-mtu 1200
remote usa.vanishedvpn.com 1194 udp
route-nopull
script-security 2
up /etc/openvpn/usa-up.sh
<ca>
—–BEGIN CERTIFICATE—–
MIIDNTCCAh2gAwIBAgIJAMQa+rPdk6lHMA0GCSqGSIb3DQEBCwUAMBYxFDASBgNV
BAMMC1ZhbmlzaGVkVlBOMB4XDTE2MTAyNzA3NTQwN1oXDTI2MTAyNTA3NTQwN1ow
FjEUMBIGA1UEAwwLVmFuaXNoZWRWUE4wggEiMA0GCSqGSIb3DQEBAQUAA4IBDwAw
ggEKAoIBAQCarKifraPvg94Bfiy5EcHYnpAG6sUwvf4nH9YXQXXaNjz3uqRI+Pzs
03Z94ApLkzZm0jC1SyFbY6JxbqF5N87nw7PuWumamwr0VIOiu5ZeDgRMuxu5QK+c
w8AzrmZruPMdWIxUl5I9akC0Aucm1AcK0P3Ksd1VHWzox/ixJz42zJ0sTeIHjarp
IHsczCWc4VFk2K1D43F/HG9IXGusumwbOvY1HMQ/2qgN2q3FIuS9imLv0etApqMp
C4tDPQC5YWQSMhr0N2zjB5gsIgac5v+OIIr5VwLBTnmXYmCMfxG6E4TDQX3axc1x
Y0vB0w3r74u38iz2MNLF7xfH+/DY3N1fAgMBAAGjgYUwgYIwHQYDVR0OBBYEFJxs
VLWgp+toUyDtYNU9fmgyXyOEMEYGA1UdIwQ/MD2AFJxsVLWgp+toUyDtYNU9fmgy
XyOEoRqkGDAWMRQwEgYDVQQDDAtWYW5pc2hlZFZQToIJAMQa+rPdk6lHMAwGA1Ud
EwQFMAMBAf8wCwYDVR0PBAQDAgEGMA0GCSqGSIb3DQEBCwUAA4IBAQCJUHg1wrH2
X9AQGed2MJe02TKG3qnYQlHpAo0TnveyEBr0eEP5wsI4YvrMSw+NJL4jq/KYXmPJ
DARTJjDKRx/GxLm51AQRZJSFWQ00QxQ3mXskPZOsWN6pv13EUvxUdJ3f8N4kEIDA
rQ/+ssSxJuyFKIOp2Lyhc22oGfhwYp8CXbFkNRCCyQNk+MuKlZP8wFV46lewDysN
mh8lKCdHihyT6bdsOPG0jKQCB/y3jNBoscdpEHOdkQYFlW6Hd8xixP0e5yejVJXz
K9WyBPQXrswv0/3Blbv/BCFpIN5ObGnfLx2qO3S27uzNfVjWCTaWH85LkksiiTBY
1GmsvVD/8aCt
—–END CERTIFICATE—–
——
/etc/config/network
——
config interface ‘Vanished_USA’
option proto ‘none’
option ifname ‘tun1’
option defaultroute ‘0’
option mtu ‘1200’
——
Our startup script:
——
#!/bin/ash
logger “OVPN: ifconfig_remote = $ifconfig_remote”
logger “OVPN: ifconfig_local = $ifconfig_local”
logger “OVPN: trusted_ip = $trusted_ip”
table=100
rule=”rule add from 10.1.2.0/24 priority 10 table $table”
route=”route add 10.1.2.0/24 dev $dev table $table”
route2=”route add default via $ifconfig_local dev $dev table $table”
logger “OVPN: ip $route”
logger “OVPN: ip $route2”
logger “OVPN: ip $rule”
ip $rule
ip $route
ip $route2
iptable1=”-I FORWARD -o $dev -j ACCEPT”
iptable2=”-t nat -I POSTROUTING -o $dev -j MASQUERADE”
iptable3=”-I FORWARD -i br-vanished -o eth0 -j ACCEPT”
logger “OVPN: iptables $iptable1”
logger “OVPN: iptables $iptable2”
logger “OVPN: iptables $iptable3”
iptables $iptable1
iptables $iptable2
iptables $iptable3
flush=”route flush cache”
logger “OVPN: ip $flush”
ip $flush
——
How to save password for automatic login – OpenVPN (Windows / Linux)
Save Password in OpenVPN for Automatic Login
By default, OpenVPN does not save the username and password which requires you to input them in each time you connect to the server. This is good from a security perspective, but there are sometimes where it is required to have this information saved to permit automatic logins to OpenVPN.
If you need to save the username and password to a VPN connection, follow the steps below.
Navigate to your config folder for OpenVPN. Some common paths for this folder are: Windows – C:\Program Files (x86)\OpenVPN\configLinux – /etc/openvpn

If you have a subfolder within the config folder where your configuration files/certs reside, make sure to dive down to that folder.
Create a new text file in this folder. We’ll name ours “auth.txt”. The contents of this text file should simply be two lines. The first line should be your username, and the second should be your password. Save this file.

Now open your OpenVPN config file, which should be in the same folder, in a text editor (if on Windows use Notepad++ instead of Notepad). These files typically end in a .ovpn extension. Find the line that says “auth-user-pass” and change it to “auth-user-pass auth.txt”, where “auth.txt” is the name of the file containing your username and password.
Save this file.

Try to connect to OpenVPN. You may need to restart the OpenVPN client and you should now connect without a username and password prompt!
How to setup OpenVPN on Windows
This setup will involve downloading the OpenVPN app and downloading and applying the VanisheVPN openVPN config files. It should take you around 5 > 10 minutes to setup.
1. Download and install the OpenVPN software from openvpn.net. Make sure to allow the TAP drivers to install when you receive the pop-up later on during the installation.

2. Download the VanishedVPN OpenVPN config file from here for the Server that you want (i.e. usa.ovpn for the USA VPN to watch US Netflix)

3. Move the file that you downloaded (USA.ovpn in our example) to your OpenVPN config folder at (C:\Program Files\OpenVPN\config). Click continue when asked for administrator access to continue.
4. Right click on the OpenVPN GUI shortcut icon on your desktop, and choose ‘run as administrator‘

5. Right click on the OpenVPN icon in the task bar at the bottom of your screen.
6. Select the connection that you want (USA in our example), and select ‘connect’ from the drop down menu.

7. Copy and paste your VPN username (your email address) and password that you can see on the ‘my account’ dashboard on our site. These are case sensitive.

8. The icon should turn green to show that you’re connected.
9. To test that you’re connected, try and play some content from the location that you are now connected to (for example if you are connected to USA, navigate to netflix.com and you should see the US catalogue).
NOTE – by default, the Windows OpenVPN client requires you to input your username / password each time you connect. If you would like to change this to save your credentials, follow the guide here.
Troubleshooting
If OpenVPN does not connect as expected, ensure that:
1) Your username and password has been copied and pasted from your welcome email
2) When you run OpenVPN, you choose ‘run as administrator‘
OPENVPN – Know what you’re doing ? Just need the config files ?
If you know how to setup OpenVPN on your device, and just need the files you can download the VanishedVPN OpenVPN config file from the ‘my account / VPN config files’ section of our site here for the Server that you want (i.e. usa.ovpn for the USA VPN to watch US Netflix)

If you have a legacy account, which has not been moved to our new site yet, you can access the files here
How to setup OpenVPN on DD-WRT (Older versions – with no username / Password box)
The Image below shows a working config of OpenVPN running on a DD-WRT router (V24).
Instructions.
Open a web browser, and navigate to the home screen of your DD-WRT router (192.168.1.1 by default)
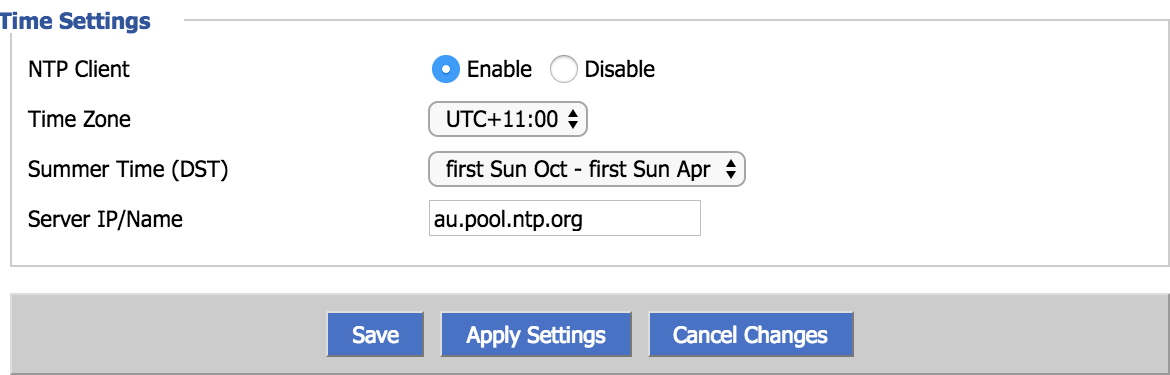
1) Under SETUP/BASIC Setup go to the bottom of the screen and in the ‘time settings’ box, ensure that NTP CLIENT is enabled, and set to the correct time zone.
2 ) Navigate to SERVICES / VPN, and enter the config as shown in Fig 1 below. For this example, we have chosen the USA Server. You can enter any server from the list below depending on what Services you wish to use.
| Servername | Use for |
| usa.vanishedvpn.com | Unblocking US content (Netflix, Hulu, Starz, Vudu, Sling TV, NBC etc) |
| sport.vanishedvpn.com | EPL, F1, Cricket, Sling TV |
| uk.vanishedvpn.com | Unblocking UK content (BBC iPlayer, ITV.com, NOW TV, Sky GO, Channel 4 etc) |
| aus.vanishedvpn.com | Secure browsing, Access to Aus channels while travelling outside Australia (Foxtel Go, Plus 7, 9 Now, Ten Play) |
| p2p.vanishedvpn.com | P2P & Bit Torrent – These servers are based in a location where the laws on Bit Torrent are liberal. Bit Torrent is disabled on all other servers. |
3) For this version of DD-WRT, there is no username / password box on the OpenVPN client screen, so it is necessary to add the following text to the ‘Additional Config’ field:
auth-user-pass /tmp/credentials.txt
If you are running a later version of DD-WRT that has a username / password box, simply enter your VPN credentials in there, and leave the ‘additional config blank
FIG1

4) Highlight the red text below and copy and paste in to the Ca Cert box on the DD-WRT screen.
-----BEGIN CERTIFICATE-----
MIIDNTCCAh2gAwIBAgIJAMQa+rPdk6lHMA0GCSqGSIb3DQEBCwUAMBYxFDASBgNV
BAMMC1ZhbmlzaGVkVlBOMB4XDTE2MTAyNzA3NTQwN1oXDTI2MTAyNTA3NTQwN1ow
FjEUMBIGA1UEAwwLVmFuaXNoZWRWUE4wggEiMA0GCSqGSIb3DQEBAQUAA4IBDwAw
ggEKAoIBAQCarKifraPvg94Bfiy5EcHYnpAG6sUwvf4nH9YXQXXaNjz3uqRI+Pzs
03Z94ApLkzZm0jC1SyFbY6JxbqF5N87nw7PuWumamwr0VIOiu5ZeDgRMuxu5QK+c
w8AzrmZruPMdWIxUl5I9akC0Aucm1AcK0P3Ksd1VHWzox/ixJz42zJ0sTeIHjarp
IHsczCWc4VFk2K1D43F/HG9IXGusumwbOvY1HMQ/2qgN2q3FIuS9imLv0etApqMp
C4tDPQC5YWQSMhr0N2zjB5gsIgac5v+OIIr5VwLBTnmXYmCMfxG6E4TDQX3axc1x
Y0vB0w3r74u38iz2MNLF7xfH+/DY3N1fAgMBAAGjgYUwgYIwHQYDVR0OBBYEFJxs
VLWgp+toUyDtYNU9fmgyXyOEMEYGA1UdIwQ/MD2AFJxsVLWgp+toUyDtYNU9fmgy
XyOEoRqkGDAWMRQwEgYDVQQDDAtWYW5pc2hlZFZQToIJAMQa+rPdk6lHMAwGA1Ud
EwQFMAMBAf8wCwYDVR0PBAQDAgEGMA0GCSqGSIb3DQEBCwUAA4IBAQCJUHg1wrH2
X9AQGed2MJe02TKG3qnYQlHpAo0TnveyEBr0eEP5wsI4YvrMSw+NJL4jq/KYXmPJ
DARTJjDKRx/GxLm51AQRZJSFWQ00QxQ3mXskPZOsWN6pv13EUvxUdJ3f8N4kEIDA
rQ/+ssSxJuyFKIOp2Lyhc22oGfhwYp8CXbFkNRCCyQNk+MuKlZP8wFV46lewDysN
mh8lKCdHihyT6bdsOPG0jKQCB/y3jNBoscdpEHOdkQYFlW6Hd8xixP0e5yejVJXz
K9WyBPQXrswv0/3Blbv/BCFpIN5ObGnfLx2qO3S27uzNfVjWCTaWH85LkksiiTBY
1GmsvVD/8aCt
-----END CERTIFICATE-----
Click ‘Apply settings’
For older versions which do not have a username / password field on the OpenVPN client screen, it is also necessary to define the username and password as variables in the startup script (under Administration / Commands). Enter the following into the ‘Commands’ box, and then click ‘save startup’
#!/bin/sh
echo username > /tmp/credentials.txt
echo password >> /tmp/credentials.txt
Fig 2

5) Under Administration / Management , click the reboot router button
6) When the interface returns, you can check if the VPN is running by navigating to STATUS / OPENVPN
You should see ‘CONNECTED : SUCCESS’ in the ‘state’ box at the top of the screen. You may need to refresh this page if the connection is being established.
If you don’t see anything on the status screen, navigate back to SERVICES / VPN and click on the apply settings button at the bottom of the page. Go back to the SERVICES / VPN page and check the status again. If you still don’t see ‘CONNECTED : SUCCESS’ in the ‘state’ box at the top of the screen, its time to double check that your config is correct, and try again.
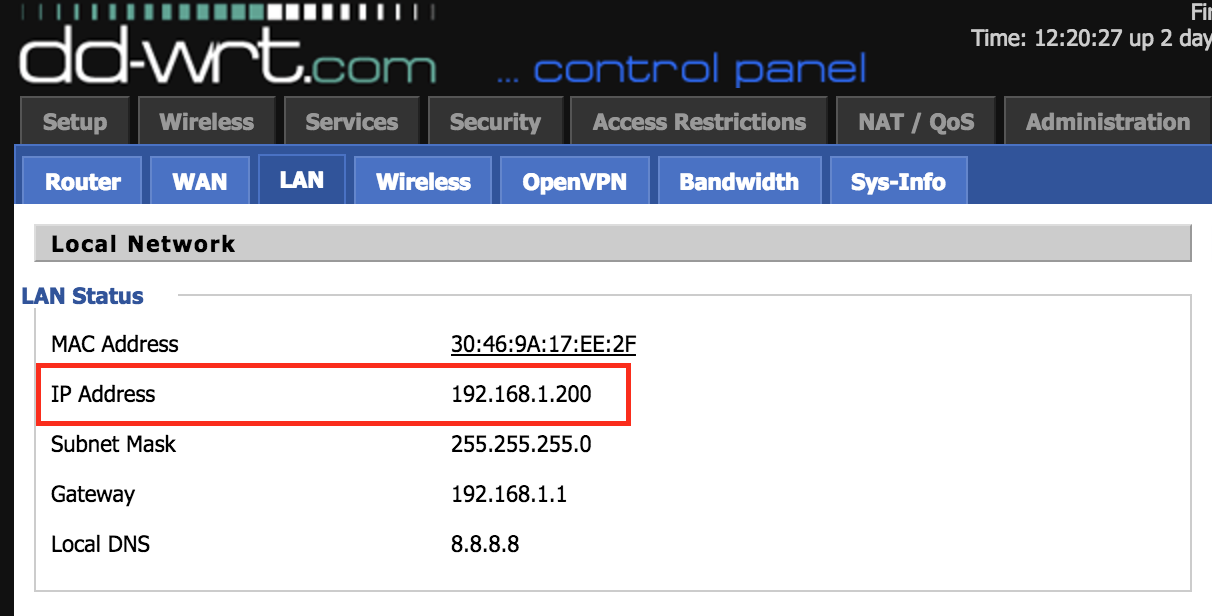
7) Once you are successfully connected to the VPN, any device that you configure to use the IP address of this router as its ‘router’ or ‘gateway’ will be using the OpenVPN tunnel, and you should be able to access content from unblocked sites (i.e. US Netflix in the example above). To determine the IP address of your DD-WRT router navigate to STATUS / LAN and you will see the address under ‘IP Address’. In the example below the router IP address is 192.168.1.200