Routers
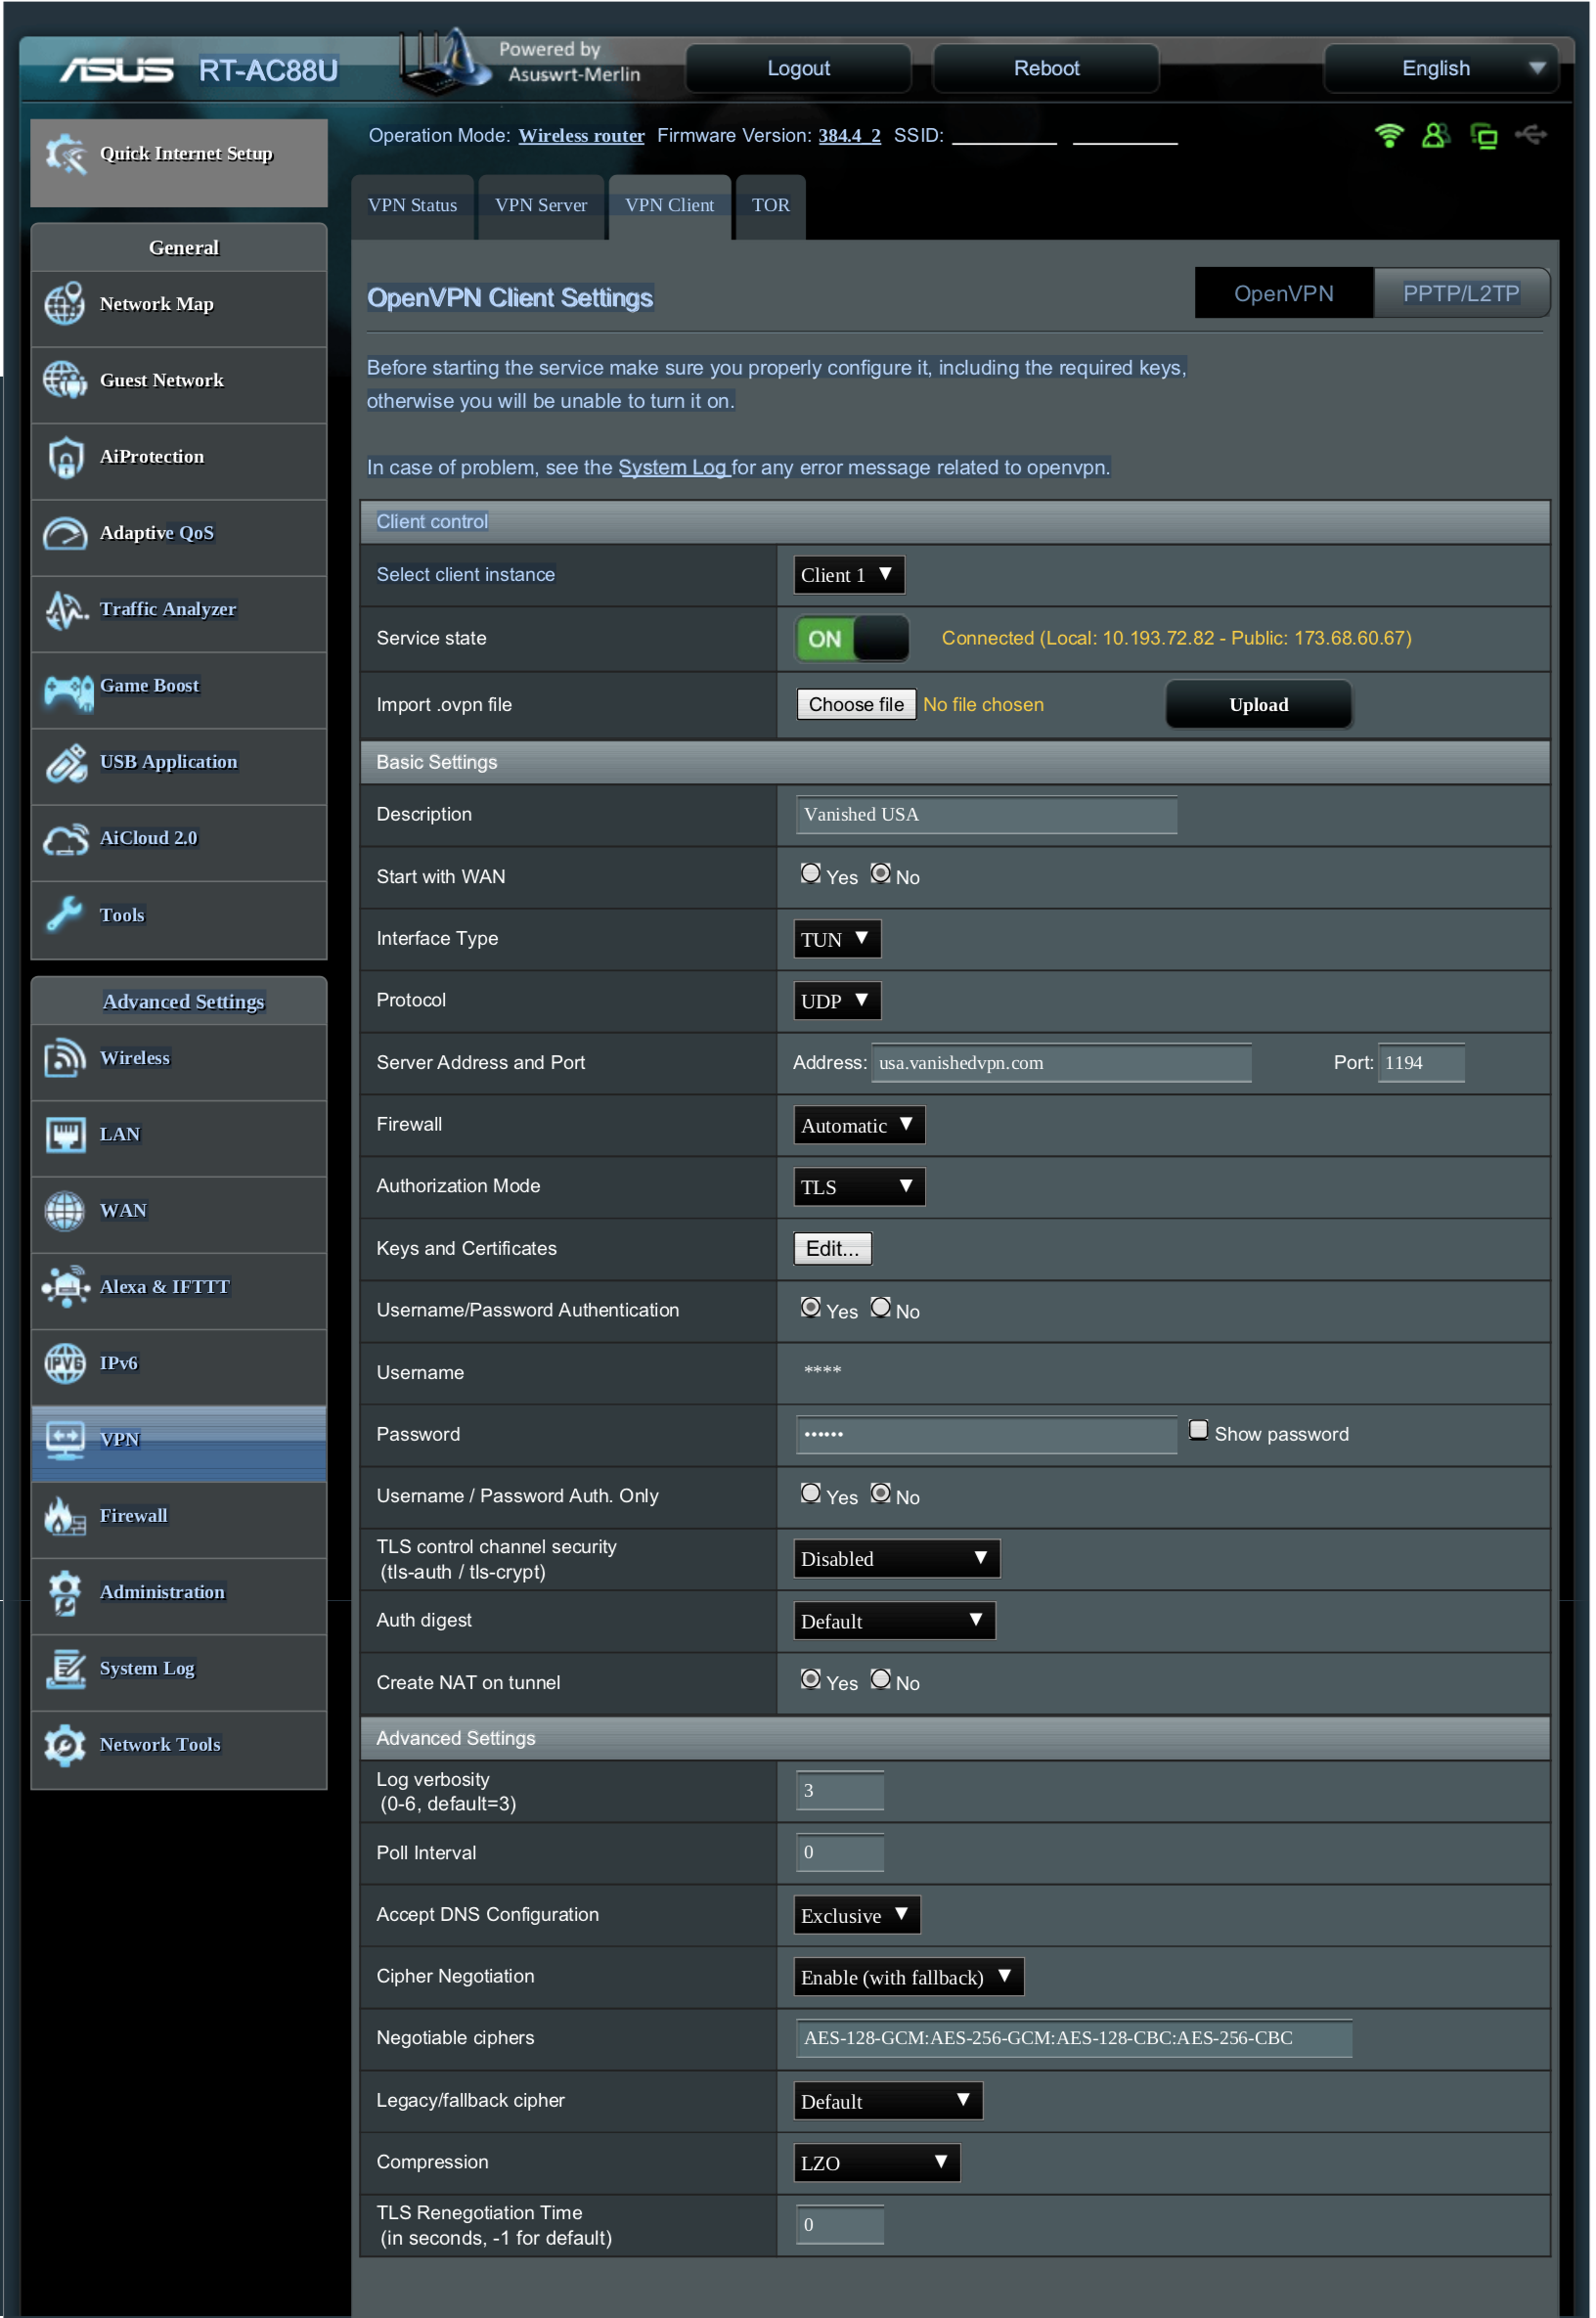
Example of working config on ASUS MERLIN firmware
General Notes
Its a good idea to start with wan option enabled, though this of course is optional.
The Accept DNS option is best set to exclusive. If you want to change it you should know what the effect is. It defaults to disabled and other settings are less secure, which may be the source of DNS leak reports with this firmware.
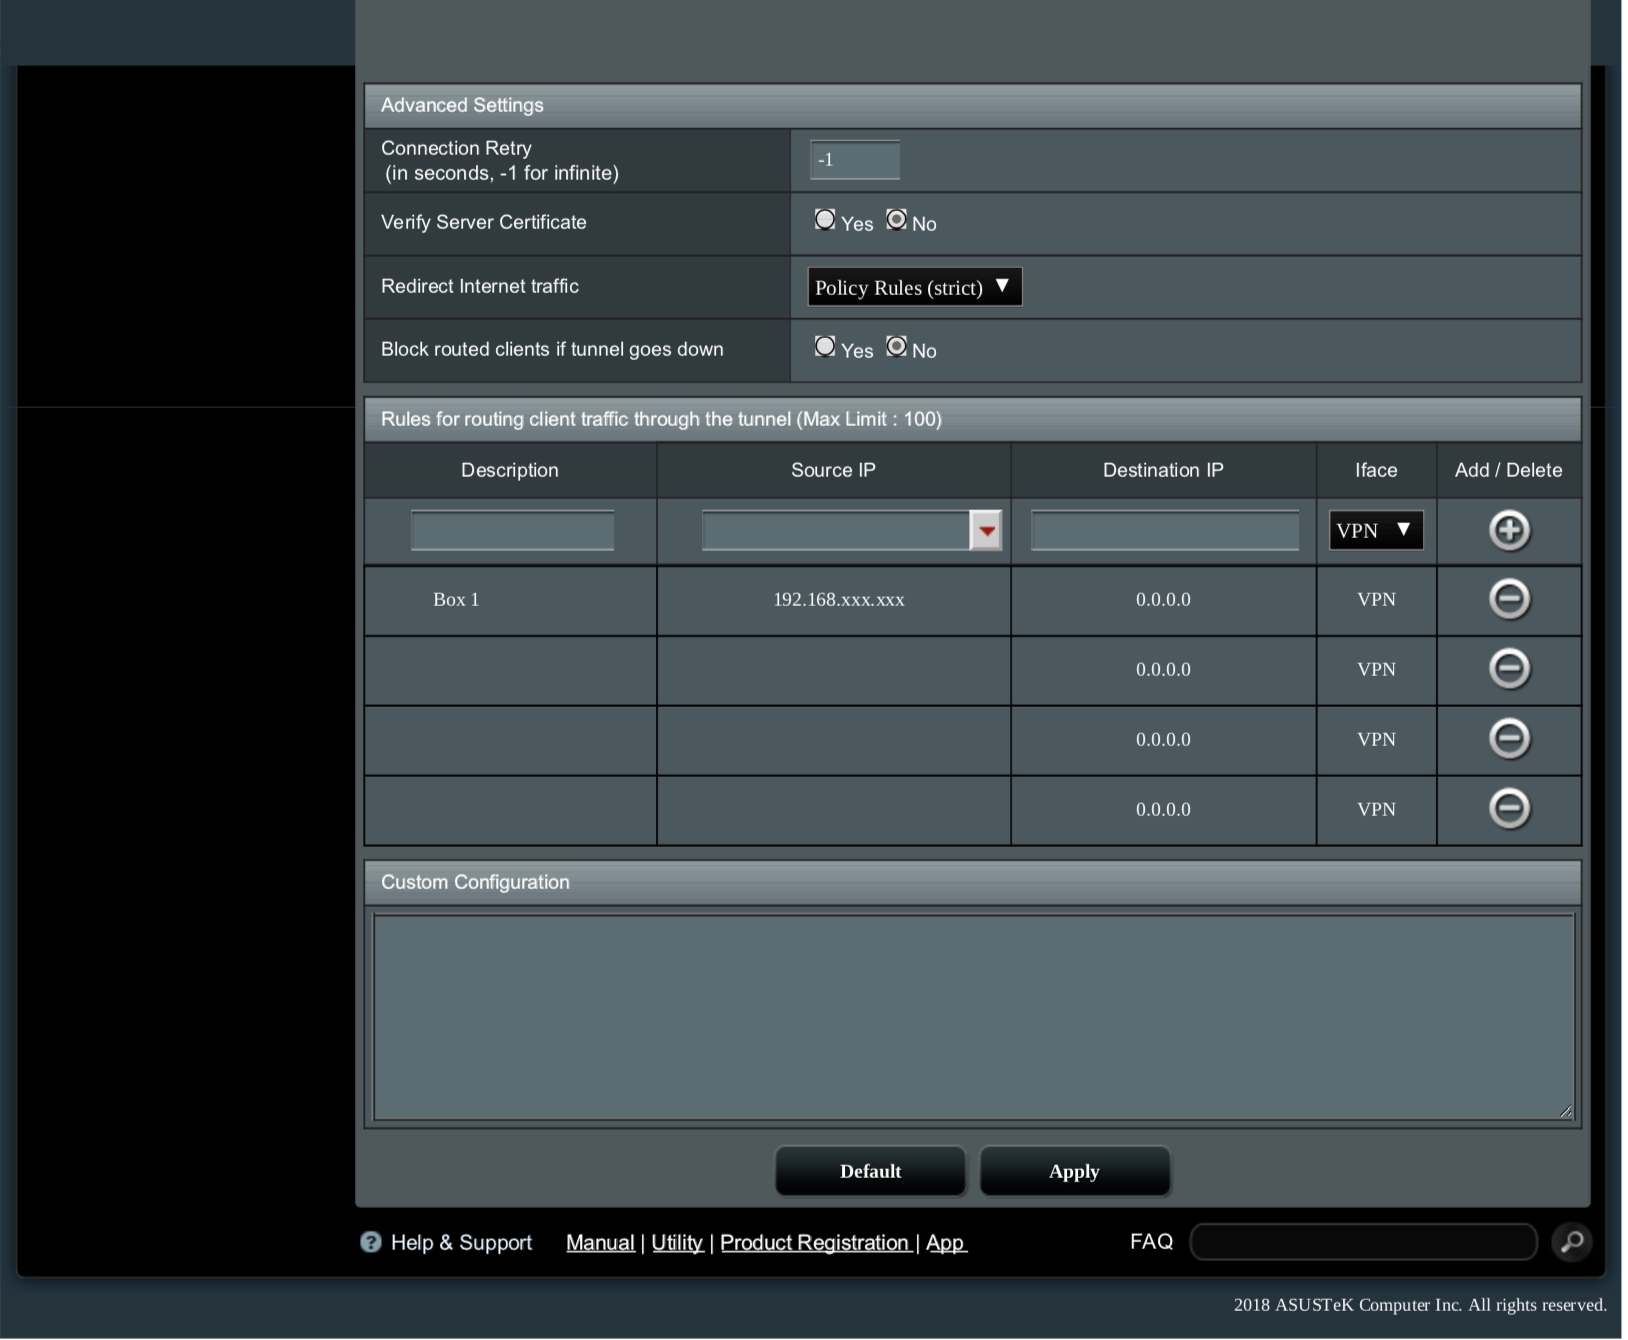
Redirect Internet Traffic is set to “Policy Rules (strict)”. This option lets you direct by IP address (or by subnet) which boxes on your network direct traffic through the VPN. You should, of course, set the DHCP Server to give these boxes a fixed ip address. It is also possible to specify exceptions by destination.
Policy rules should be set to strict, though if you have static routing it can cause problems in which case you can use the less secure “policy rules” setup. You can also, of course, choose to divert all internet access through the VPN which is far less flexible.
Finally, there is the option to block internet access from any device routed through the VPN if the tunnel goes down.
ASUS Routers – Being detected ? Change DNS settings
If you’re running devices like ATV, Smart TV etc through your router, and find that you are being detected despite running a VPN on the router, we suggest that you change your router DNS settings to the standard google DNS servers.
This guide shows how to do this on an ASUS router. The principal is the same for all routers.
1) Navigate to you router config screen (normally 192.168.1.1 in your browser, or router.asus.com)

Login with the default credentials:
Click on the ‘wan’ icon on the left hand toolbar (see pic above)
Once you are in the ‘wan internet connection screen’ (as above), under ‘WAN DNS setting’, click the ‘no’ button, and enter the following in the boxes (as per the red highlighted boxes in the pic above).
DNS Server1 8.8.8.8
DNS server2 8.8.4.4
Click the ‘Apply’ button at the bottom of the screen, and wait for the changes to be applied.
Connect to the VPN again, and test your device.
Still being detected ? Ensure that the setting for ‘gateway’ or ‘router’ on the device is pointing at the router (normally 192.168.1.1)
Example of working config for ASUS RT-AC68U
For router config, we recommend FlashRouters who provide either support or pre-configured routers which will work with our VPNs.
The following screen shots are examples of a working config on the ASUS RT-AC68U router.

Asus RT-AC87U Router – Example of working config
For router config, we recommend FlashRouters who provide either support or pre-configured routers which will work with our VPNs.
The following screen shots are examples of a working config on the ASUS RT-AC87U router.


Example Router Config – DD-WRT
For router config, we recommend FlashRouters who provide either support or pre-configured routers which will work with our VPNs.
Please follow below steps to configure VanishedVPN PPTP on your DD-WRT router.
Before you start, please make sure of the following:
- You have already tested PPTP VPN on your PC/Mac to ensure that your network configuration and ISP allows PPTP connections.
- VPN can’t be setup on the device that acts as your ISP modem. You need to have an additional router connected to your modem.
- Make sure you have network setup as shown in the image below.
This image shows that how your network setup will look like:

Step 1: Access the DD-WRT Web GUI using a web browser pointing to the router’s internal IP address. These are some of the most common default IP addresses: 192.168.1.1 (most commonly used on Linksys and Asus), 192.168.2.1 (some Belkins), 192.168.11.1 (some Buffalos), 192.168.10.1 or 192.168.30.1 (some Motorolas), and there may be others.
The default username is root and the default password is admin (from v23 SP1). Some earlier versions of DD-WRT did not require a username.
Step 2: Go to Setup then select Basic Setup.
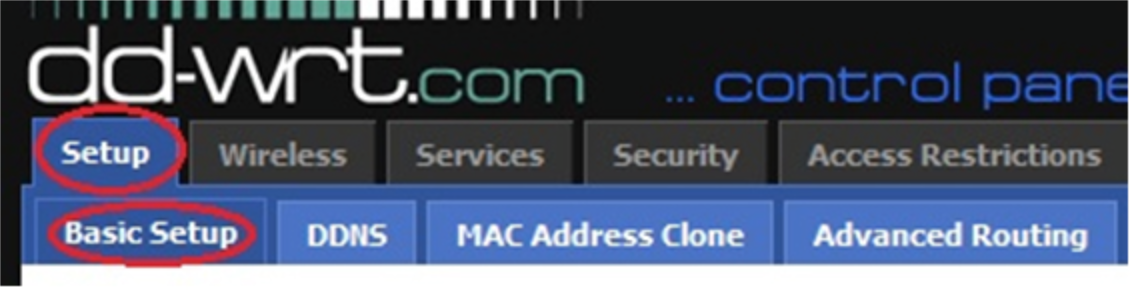
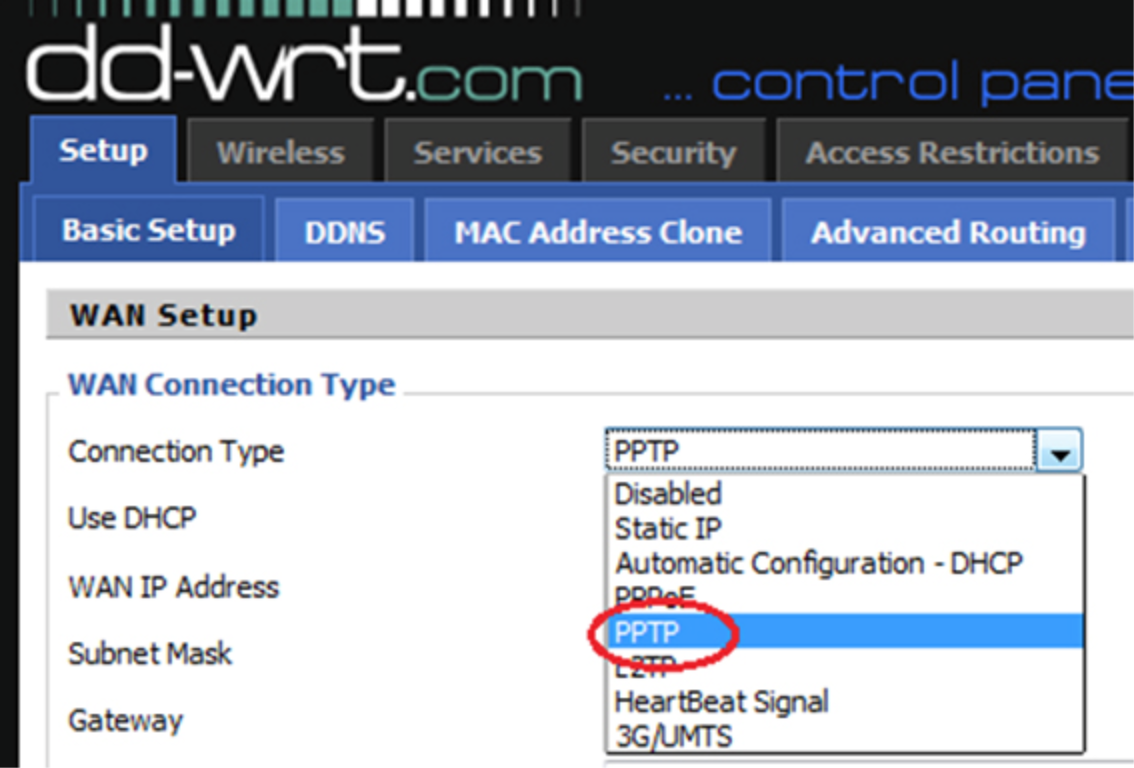
Step 3: Under WAN Connection Type select PPTP.
Step 4: Under Use DHCP select Yes.

Step 5: Under Gateway (PPTP Server), enter the VanishedVPN server address you want to connect to. For a list of all servers, see VanishedVPN – Setup Guide.
Under User Name enter your VPN username. Under Password enter your VPN password. Check the email “Message from Vanished VPN” for your login details.

Step 6: Enable PPTP (or MPPE) Encryption.

Step 7: Disable STP.

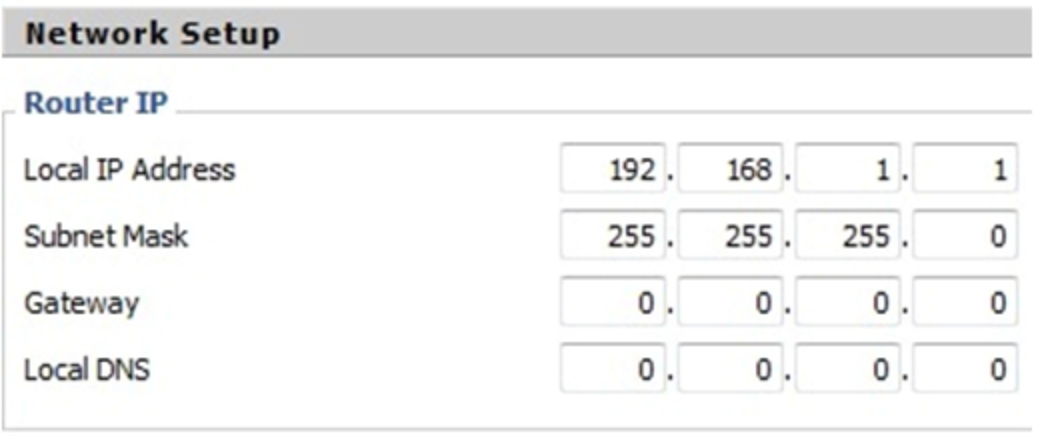
Step 8: Enter an IP address for the DD-WRT router. Note: We assume this is the second router, and your first router (or DSL/Cable modem) has a different LAN subnet e.g. 192.168.0.1.
Step 9: Enable DHCP Server. Enter 8.8.8.8 and 8.8.4.4 for “Static DNS 1” and “Static DNS 2”, respectively.
Uncheck all three checkboxes for “Use DNSMasq for DHCP”, “Use DNSMasq for DNS” and “DHCP-Authoritative”.

Step 10: Apply Settings.
Step 11: Click on Security then Firewall and set SPI Firewall to Disable. Click Apply Settings button to save.
Step 12: Click on VPN Passthrough and enable PPTP Passthrough.

Step 13: Click Apply Settings.
Step 14: Click on Administration Tab. Scroll down and click on Reboot Router.

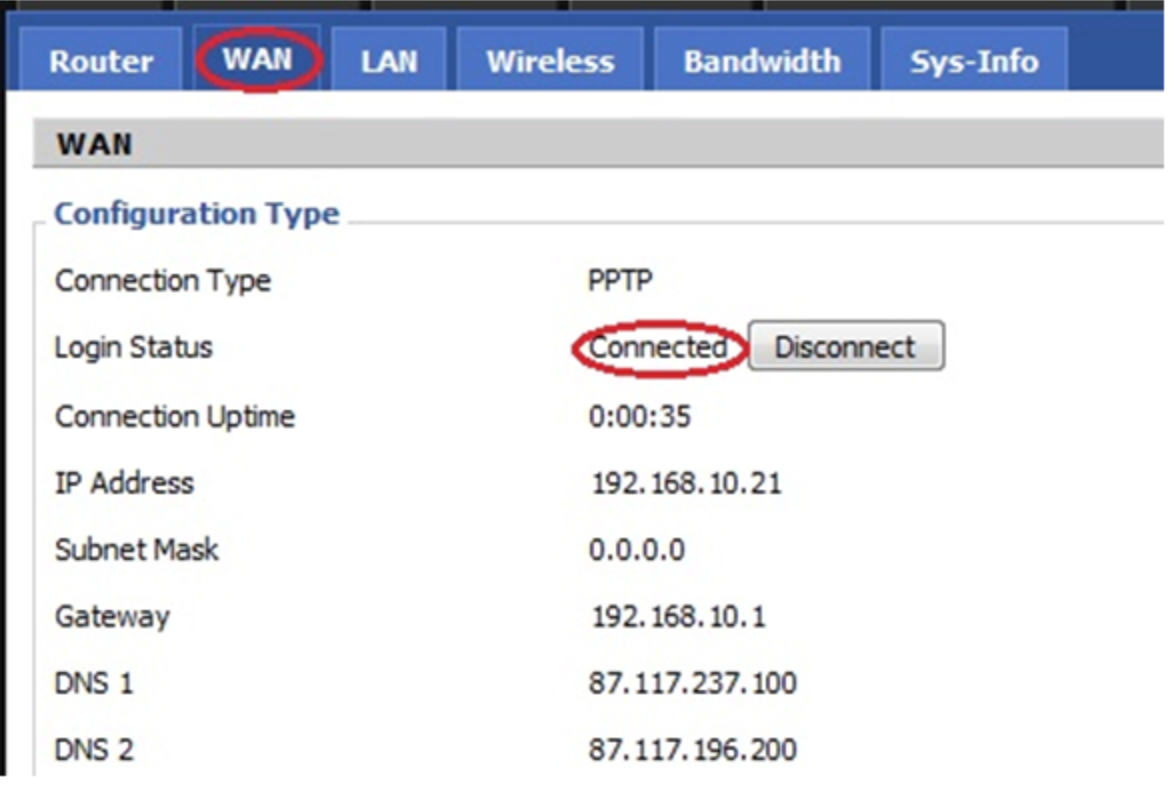
After the router reboots (may take a few minutes), it should connect to the VPN automatically. Now you can check the connection status by going to Status -> WAN tab.
If “Login Status” says Connected then it’s OK. If it says “Disconnected” click on “Connect” button and wait for about 1 minute. After that the connection should be established.
You can check if you are connected to a VPN server by going to www.whatismyip.com and see if your IP is changed.
** If you are still unable to connect at this point, we recommend enabling ‘dual access’ mode if you have that option.
Example Router Config – Asus
For router config, we recommend FlashRouters who provide either support or pre-configured routers which will work with our VPNs.
Please follow below steps to configure VanishedVPN PPTP on your Asus router.
Before you start, please make sure of the following:
- You have already tested PPTP VPN on your PC/Mac to ensure that your network configuration and ISP allows PPTP connections.
- VPN can’t be setup on the device that acts as your ISP modem. You need to have an additional router connected to your modem.
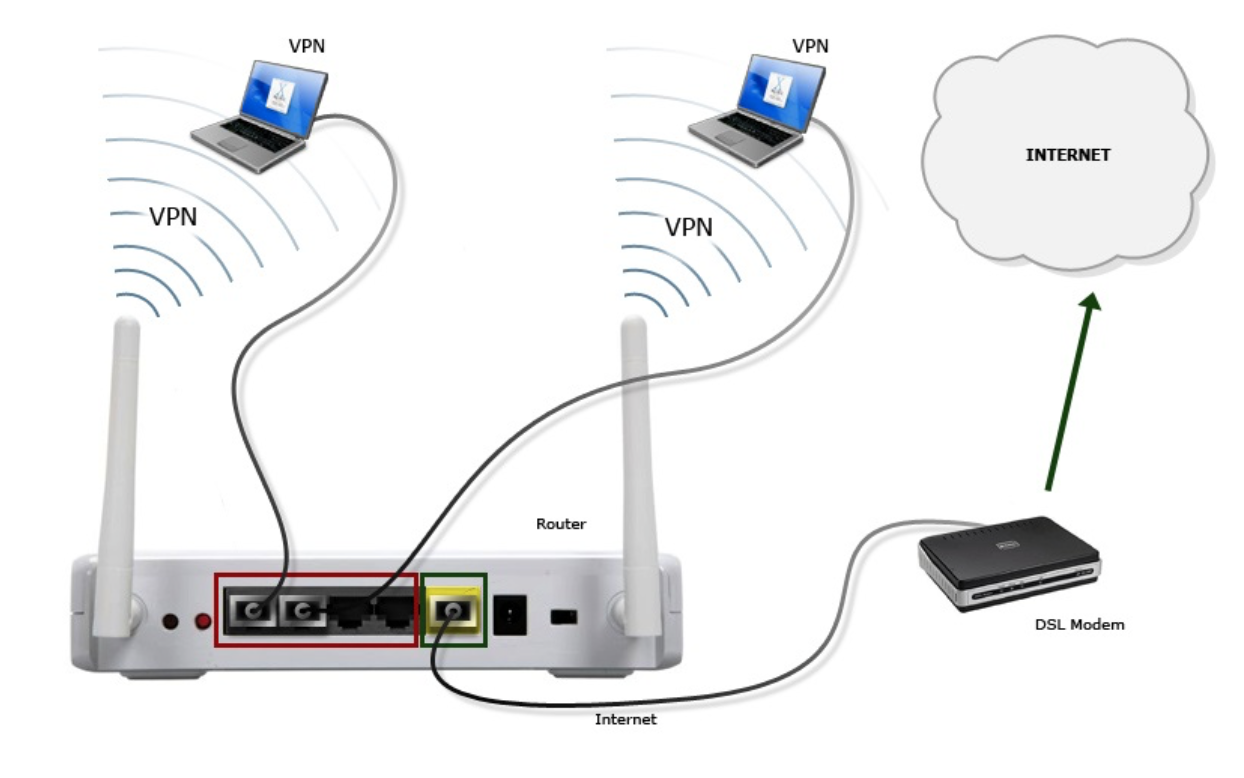
- Make sure you have network setup as shown in the image below.
This image shows that how your network setup will look like:

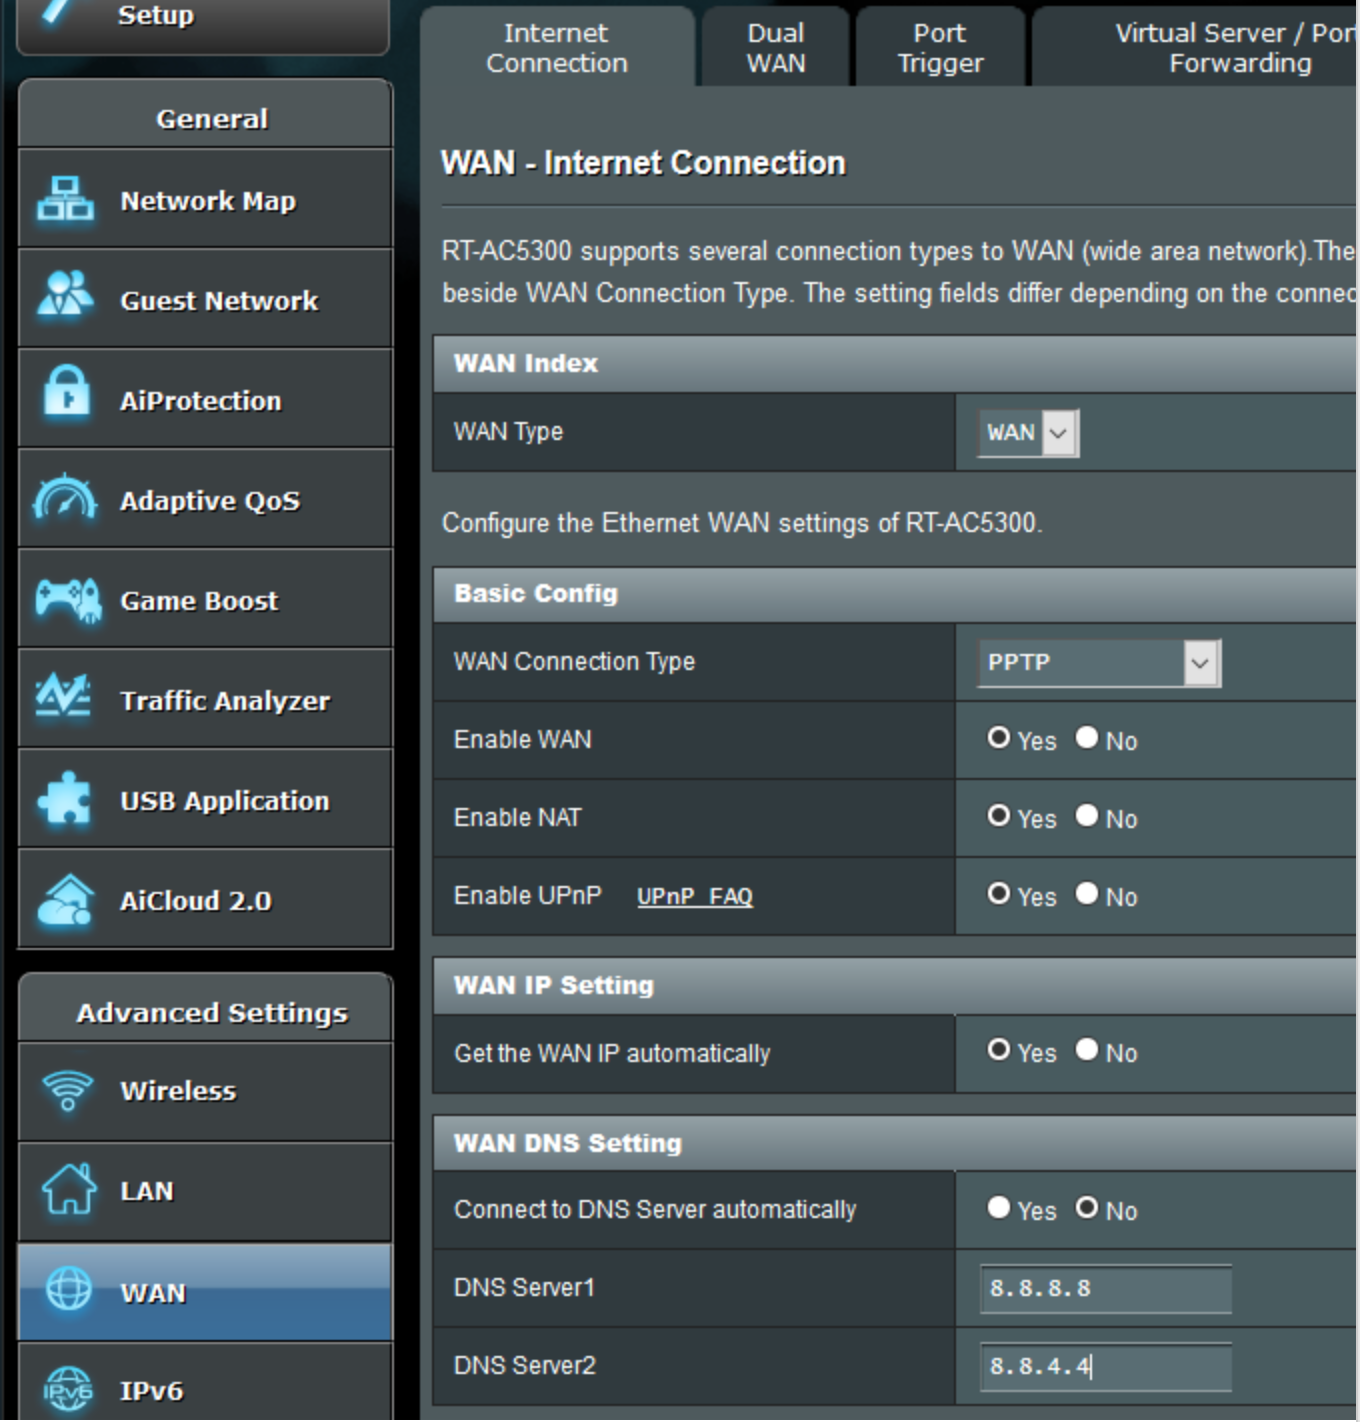
Step 1: First you will need to login to your Asus router’s control panel. To do so, type http://192.168.1.1/ in your browser and login. You can find this information on the sticker on the back of your router.
Step 2: In the left-side menu, click on “WAN” under “Advance Settings”.
Under “Internet Connection” tab change “WAN Connection Type” to “PPTP” from the drop down menu.
Apply the following settings:
a. Enable WAN: Yes
b. Enable NAT: Yes
c. Enable UPnP: Yes
d. Get the WAN IP automatically: Yes
Under “WAN DNS Setting”, set “Connect to DNS server automatically” to “No” and insert the following servers: 8.8.8.8, 8.8.4.4
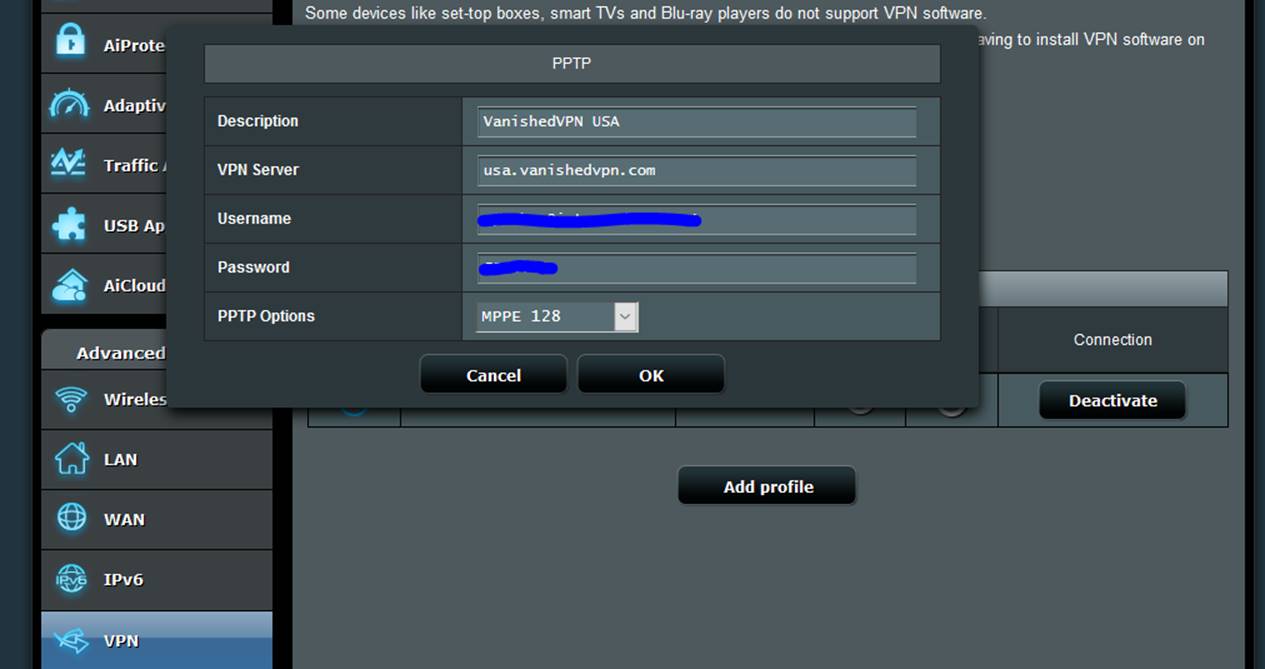
Step 3: Under “Account Settings”, enter your VPN Username and Password provided by VanishedVPN. Check the email “Message from Vanished VPN” for your login details.
Insert your desired VanishedVPN server address in “VPN Server”. For a list of all servers, see VanishedVPN – Setup Guide.
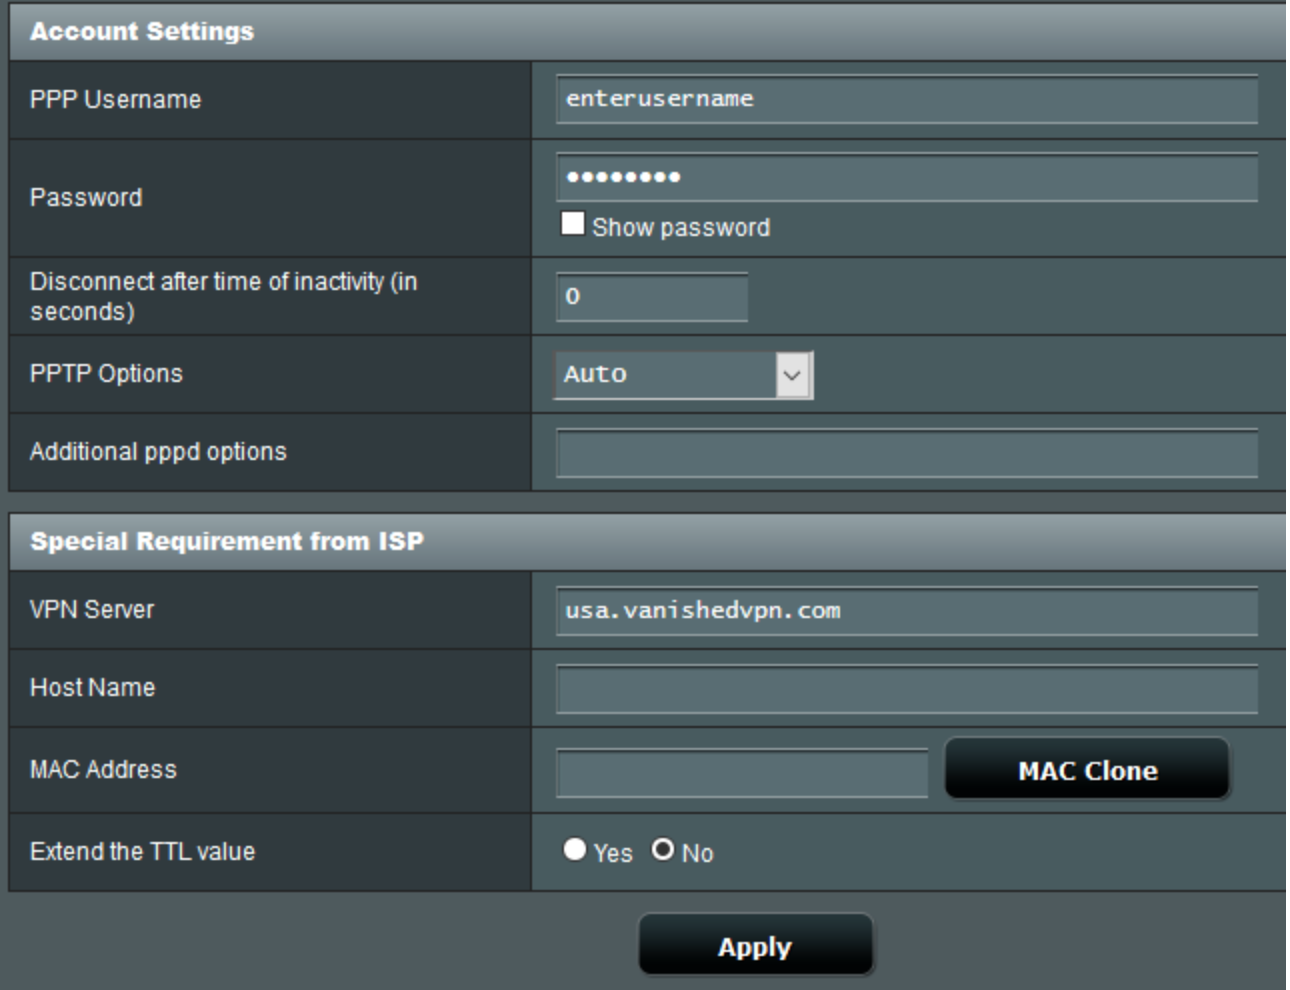
Step 4: Click “Apply”. You Are Done!
You can check if you are connected to a VPN server by going to www.whatismyip.com and see if your IP is changed.
Example Router Config – Linksys
For router config, we recommend FlashRouters who provide either support or pre-configured routers which will work with our VPNs.
Please follow below steps to configure VanishedVPN PPTP on your Linksys router.
Before you start, please make sure of the following:
- You have already tested PPTP VPN on your PC/Mac to ensure that your network configuration and ISP allows PPTP connections.
- VPN can’t be setup on the device that acts as your ISP modem. You need to have an additional router connected to your modem.
- Make sure you have network setup as shown in the image below.
This image shows that how your network setup will look like:
Step 1: First you will need to login to your Linksys router’s control panel. To do so, type http://192.168.1.1/ in your browser and login. You can find this information on the sticker on the back of your router.
Click on Setup, then click on Basic Setup. From “Internet Connection Type” drop down menu, select PPTP. Make sure “Obtain an IP Address Automatically” is selected.

Step 2: Insert your desired VanishedVPN server address in “Server IP Address”. For a list of all servers, see VanishedVPN – Setup Guide
Note: To convert a hostname (e.g. usa.vanishedvpn.com) into the IP address, open a Command Prompt and type “nslookup usa.vanishedvpn.com”.
Enter your VPN Username and Password provided by VanishedVPN. Check the email “Message from Vanished VPN” for your login details.

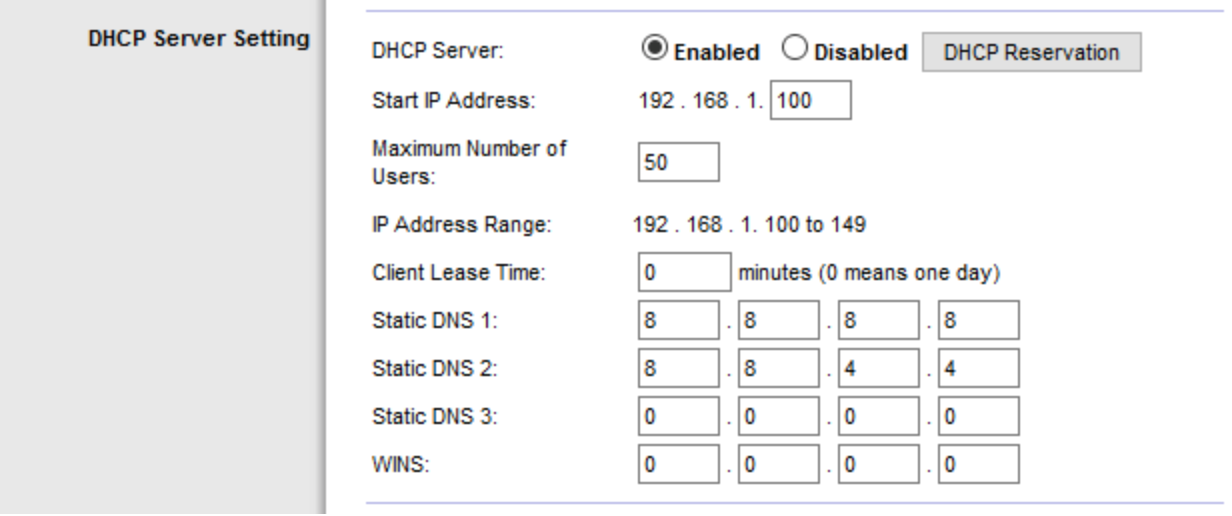
Step 3: In the “DHCP Server Setting” section, select Enabled for “DHCP Server”. Then enter 8.8.8.8 and 8.8.4.4 for “Static DNS 1” and “Static DNS 2”, respectively.
Step 4: Now scroll down and click on “Save Settings” and Reboot router.

You can check if you are connected to a VPN server by going to www.whatismyip.com and see if your IP is changed.
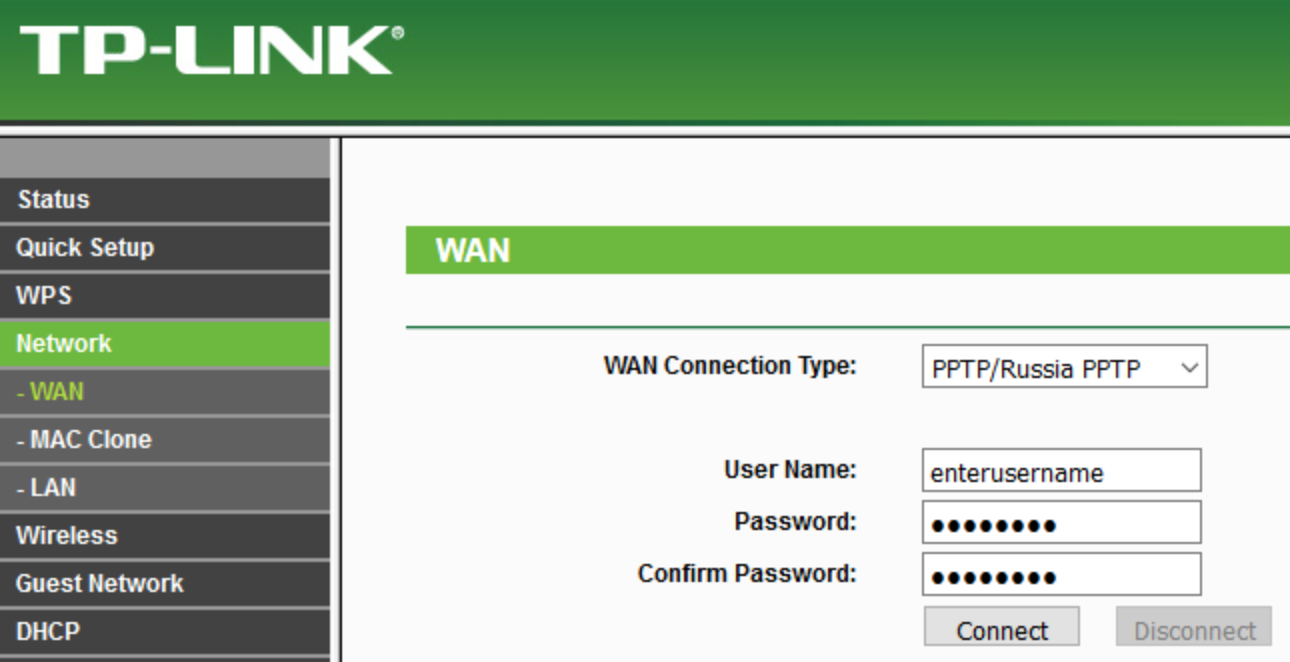
Example Router Config – TP-Link
For router config, we recommend FlashRouters who provide either support or pre-configured routers which will work with our VPNs.
Please follow below steps to configure VanishedVPN PPTP on your TP-LINK router.
Before you start, please make sure of the following:You have already tested PPTP VPN on your PC/Mac to ensure that your network configuration and ISP allows PPTP connections.
- VPN can’t be setup on the device that acts as your ISP modem. You need to have an additional router connected to your modem.
- Make sure you have network setup as shown in the image below.
This image shows that how your network setup will look like:

Step 1: First you will need to login to your TP-LINK router’s control panel. To do so, type the router’s IP address in your browser and login. You can find this information on the sticker on the back of your router.
Step 2: Click on “Network” from the left panel and then click “WAN”. In “WAN Connection Type” select “PPTP/Russia PPTP” from the drop down menu.
Enter your VPN Username and Password provided by VanishedVPN. Check the email “Message from Vanished VPN” for your login details.
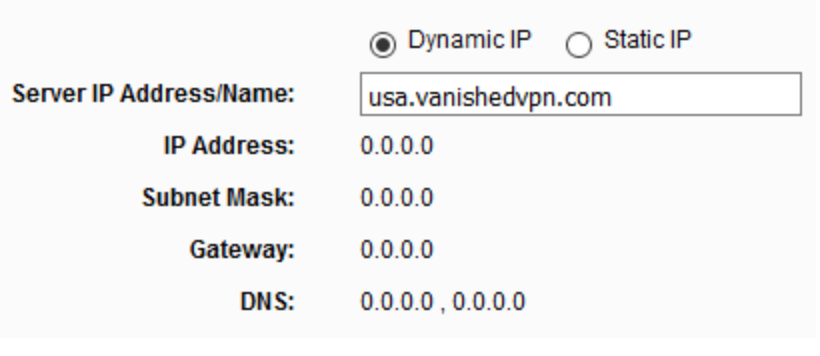
Step 3: Select “Dynamic IP”. Insert your desired VanishedVPN server address in “Server IP Address/Name”. For a list of all servers, see VanishedVPN – Setup Guide.
Step 4: Choose whether you would like to connect automatically, on demand or manually.

Step 5: When you have completed the above, click on “Save”. You Are Done!
You can check if you are connected to a VPN server by going to www.whatismyip.com and see if your IP is changed.
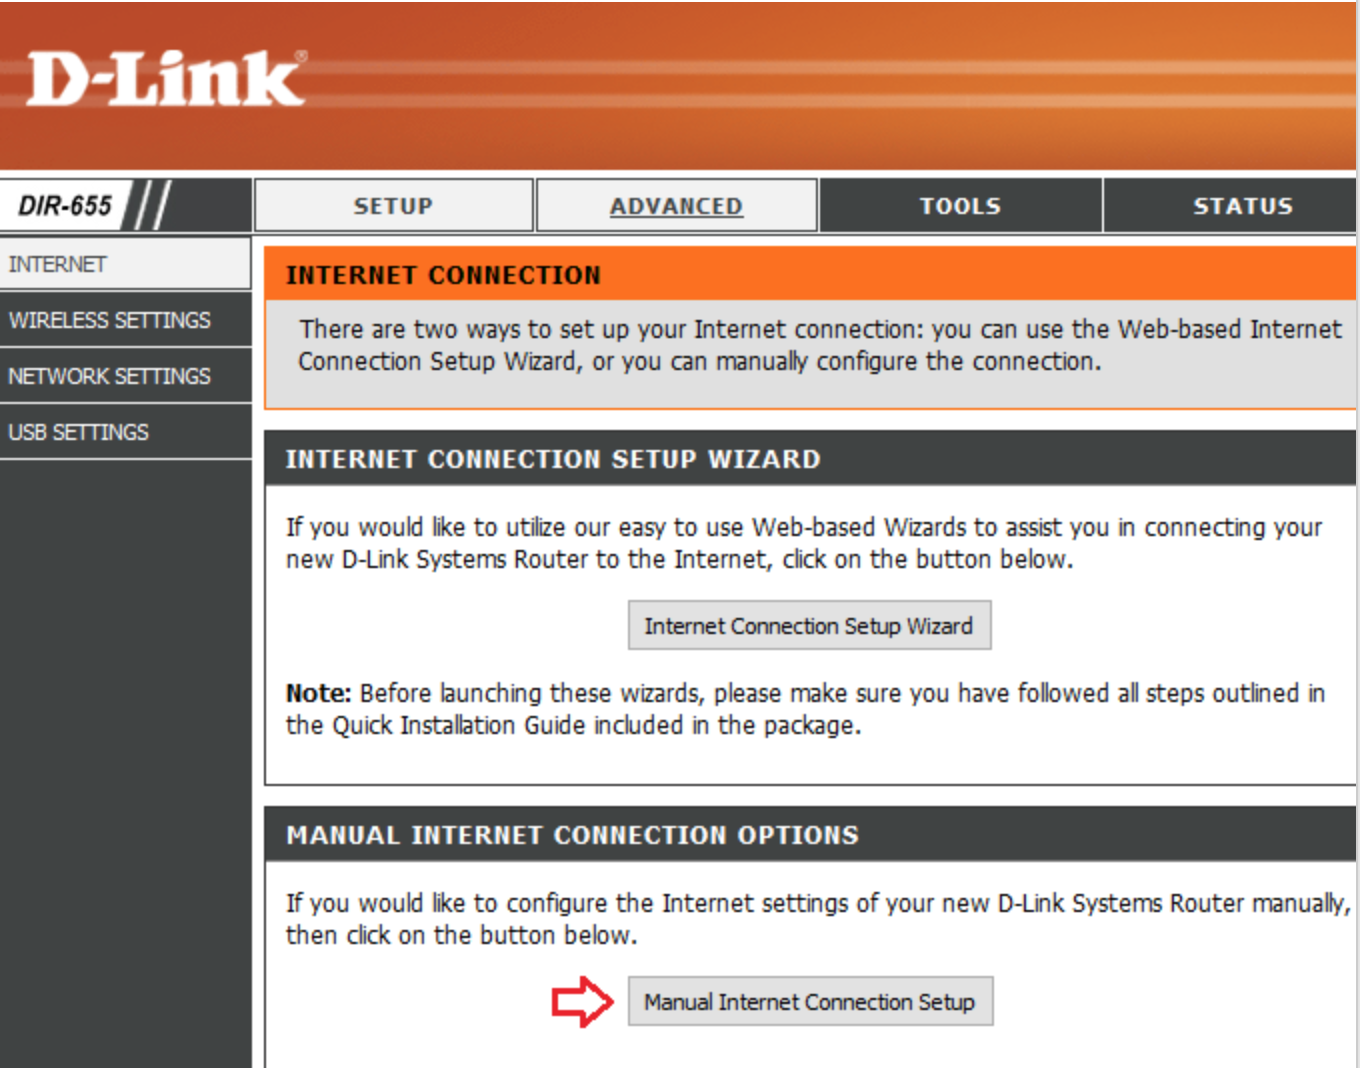
Example Router Config – D-Link
For router config, we recommend FlashRouters who provide either support or pre-configured routers which will work with our VPNs.
Please follow below steps to configure VanishedVPN PPTP on your D-Link router.
Before you start, please make sure of the following:
- You have already tested PPTP VPN on your PC/Mac to ensure that your network configuration and ISP allows PPTP connections.
- VPN can’t be setup on the device that acts as your ISP modem. You need to have an additional router connected to your modem.
- Make sure you have network setup as shown in the image below.
This image shows that how your network setup will look like:

Step 1: First you will need to login to your D-Link router’s control panel. To do so, type the router’s IP address in your browser and login. You can find this information on the sticker on the back of your router.
Step 2: Click the Setup tab in the menu, then click Internet from the left hand navigation.
Click on Manual Internet Connection Setup.
Step 3: From “My Internet Connection is:” select “PPTP (Username / Password)”.
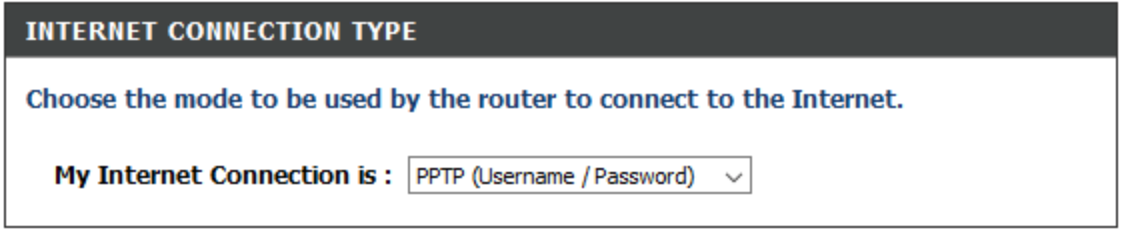
Step 4: Under “PPTP INTERNET CONNECTION TYPE” section:
1. Select Address Mode “Dynamic IP”.
2. Enter your desired VanishedVPN server address into the “PPTP Server IP Address” field. For a list of all servers, see VanishedVPN – Setup Guide.
Note: To convert a hostname (e.g. usa.vanishedvpn.com) into the IP address, open a Command Prompt and type “nslookup usa.vanishedvpn.com”.
3. Enter your VPN Username and Password provided by VanishedVPN. Check the email “Message from Vanished VPN” for your login details.
4. Select Reconnect Mode “Always on”.
5. Enter 8.8.8.8 and 8.8.4.4 for the “Primary DNS Server” and “Secondary DNS Server”, respectively.
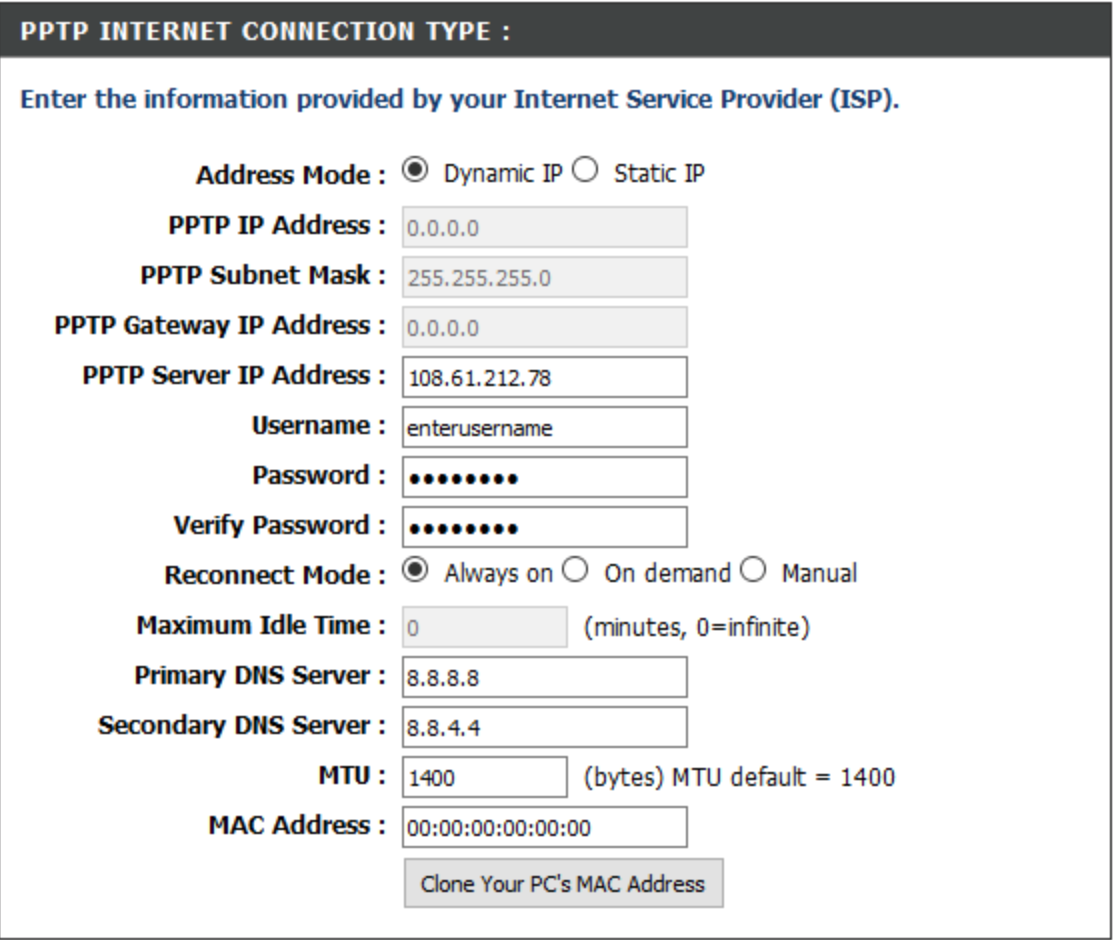
Step 5: Click on “Save Settings”. You Are Done!

You can check if you are connected to a VPN server by going to www.whatismyip.com and see if your IP is changed.